Windows Eventlogs to Syslog

Because central logging is so awesome and widely used in the Linux/Unix world, I want to show you a way how you can also gather Windows Event Logs through the good old Syslog Server.

  • On the server side, its quite simple: Use the plain vanilla Syslog or use something with Syslog capabilities (e.g. Rsyslog or even better Splunk).
  • On your Windows System, get eventlog-to-syslog (http://code.google.com/p/eventlog-to-syslog), put the two program files in C:\Windows\System32 and install it as a service as described below:
    
    C:\Users\administrator>evtsys -i -h <SYSLOGHOST>
    Checking ignore file...
    Aug 23 20:27:25 HOSTNAME Error opening file: evtsys.cfg: The system cannot find
    the file specified.
    
    Aug 23 20:27:25 HOSTNAME Creating file with filename: evtsys.cfg
    Command completed successfully
    
    C:\Users\administrator>net start evtsys
    The Eventlog to Syslog service is starting.
    The Eventlog to Syslog service was started successfully.
    

Here are the options for eventlog-to-syslog:


Version: 4.4 (32-bit)
Usage: evtsys -i|-u|-d [-h host] [-b host] [-f facility] [-p port]
       [-t tag] [-s minutes] [-l level] [-n]
  -i           Install service
  -u           Uninstall service
  -d           Debug: run as console program
  -h host      Name of log host
  -b host      Name of secondary log host
  -f facility  Facility level of syslog message
  -l level     Minimum level to send to syslog.
               0=All/Verbose, 1=Critical, 2=Error, 3=Warning, 4=Info
  -n           Include only those events specified in the config file.
  -p port      Port number of syslogd
  -q bool      Query the Dhcp server to obtain the syslog/port to log to
               (0/1 = disable/enable)
  -t tag       Include tag as program field in syslog message.
  -s minutes   Optional interval between status messages. 0 = Disabled

Default port: 514
Default facility: daemon
Default status interval: 0
Host (-h) required if installing.

ActiveDirectory – Connectivity through NAT

Even though, ActiveDirectory communication through a NATed (and port-forwarded) interface is not officially supported by MS, there is a way to do that. I stumbled upon this issue, after forgetting it for quite some time (solved it with a nasty hack in the first place – keyword: read only DNS entries)

Situation:


 [DC1]------------>[NATed interface]------------>[DC2]<--------[Clients]

  • DC1 addresses DC2 by the address of the NAT interface
  • CLIENTS address DC2 by its real address

Problem
DC2 updates its DNS record with its current IP address (real address)
DC1 can't reach DC2 through its real IP, instead it would need the address of the NAT interface.

Solution
Add the following Registry Key on DC2 to force it to add its real and his NATed IP to its Host DNS records

HKLM\SYSTEM\CurrentControlSet\Services\DNS\Parameters
Registry Value: PublishAddresses
Registry Value Type: REG_SZ
Registry Value Data: sepparated by single whitespace

The nice thing is, that the DNS server serves the address of DC2 that is suitable for the host. If the host is on the same network as DC2 it gets its real IP, if its on the other side of the NATed interface it gets the NAT interfaces address.

More infos
DNS PublishAddresses Parameter: http://technet.microsoft.com/en-us/library/cc959753.aspx
Nice Technet Article about Replication through Firewalls: http://technet.microsoft.com/en-us/library/bb727063.aspx

Logon scripts with KiXtart

To follow up one of my previous posts (Mapping of network drives via batchfile), here is how you also could solve this kind of task using KiXtart. KiXtart is a free-format scripting language which allows to automate extensive configuration tasks, for example, but not limited to windows logon events.

Installation of KiXtart is quite simple, just get the binary, place it somewhere useful (i.e. the NETLOGON share in Windows domain environments) and edit the user accounts to use it as logon script (or write a batch logon script which calls the Kix binary).

Below is how i solved the problem of having a large list of available shares automatically checked if the user has permission to use them and if so to connect them to his computer.

I presume, you have Windows Security Groups in place, which use the same name as the shared folders.


; =============
;
; Dynamic share mapping script
;
; Author: Looke, 2010
; Filename: kixtart.kix
;
; Outline:
; * Iterates through the ServerDrives array, determines wether the
;   user is in the appropriate security group or not and maps
;   the network drive to a driveletter specified in the DriveLetters
;   array.
;
; =============

; -------------
; Admin configurable
; -------------

; Array of available groupshares
$ServerDrives = "\\SRV01\Share1",
		"\\SRV02\Share1"

; Array of available drive letters
$DriveLetters = "V:", "W:", "X:", "Y:", "Z:"

; -------------
; Better leave untouched
; -------------

; Iterator for the DriveLetters array
$DriveLetterIndex = 0

; -------------
; Removing current mappings
; -------------

; Removing mapped groupshares
FOR EACH $DriveLetter in $DriveLetters
	USE $DriveLetter /DELETE
NEXT

; -------------
; Mapping of groupshares
; -------------

; Dynamic mapping of groupshares
FOR EACH $ServerDrive in $ServerDrives

	; Getting the name of the shared folder
	; (which also is the name of the Windows Security Group)
	$Group = SPLIT($ServerDrive, "\")

	IF INGROUP($Group[3])
		USE $DriveLetters[0+$DriveLetterIndex] $ServerDrive
		IF @ERROR
			? "Failed with errorcode " + @ERROR
			  + " while mapping "
			  + $ServerDrive + " to "
			  + $DriveLetters[0+$DriveLetterIndex]
		ELSE
			? "Successfully mapped "
			  + $ServerDrive + " to "
			  + $DriveLetters[0+$DriveLetterIndex]
			$DriveLetterIndex = $DriveLetterIndex+1
		ENDIF
	ENDIF
NEXT

In my script, I didn’t make the mappings persistent. So, if you intend to also have users with laptops and a after-login VPN solution to connect to your servers, you might need to add the /PERSISTENT switch to the USE command(s).

Something else, which might be useful, is logging of logon events, as fiddling around with the windows security logs can be a bit of a pain. Missing in the script above, but can easily be integrated:


; Path to the logon logfiles (make sure, users can write to this path)
$LogPath = "\\SRV01\LOG$"

; Filenames and Paths of logon logfiles
$LogFile = "$LogPath\@WKSTA.log"

; Content of logon logfile
$LogText = "Date: @MDAYNO.@MONTHNO.@YEAR, @TIME" + CHR(13) + CHR(10) + 
	   "User: @USERID" + CHR(13) + CHR(10) + 
	   "Workstation: @WKSTA" + CHR(13) + CHR(10) + 
	   "IPs: @IPADDRESS0, @IPADDRESS1" + CHR(13) + CHR(10) + 
	   "MAC address: @ADDRESS" + CHR(13) + CHR(10) +
	   "-----------------------------------" + CHR(13) + CHR(10)

; Open, write and close Logfile
$LogError = OPEN(5, $LogFile, 5)
IF $LogError = 0
	$RES = WRITELINE(5, $LogText)
	$RES = CLOSE(5)
ENDIF 

A manual to using KiX can be found here:
http://www.kixtart.org/manual/

Deploying the open-source backup solution Bacula

It’s now about two years ago, that I wondered “Why the … are we paying support and license subscriptions, if the only benefit is that you can listen to the support line music and get a new logo in the softwares main window after each update?”. Ok, the software works so far. But for every new client, you have to relicense and especially support for linux hosts can be a real pain.

I don’t want to call any names here nor start an argument with any fanboys. But being tired of all this commercial “corporate” softwares, I want to share my approach to installing the free and open source backup software Bacula.

Please feel free, to write me if you find possible errors or misconfigurations. I plan to extend this how-to with more detailled instructions.

Well, back to bacula: This overview visualizes the interactions of all bacula modules (taken from the bacula.org wiki)

To keep things simple, I start with a small but expandable test installation, consisting of one server and one or maybe two clients. In this case:

Hosts

  • bacula-server (Debian Lenny) – Director, Storage Daemon, File Daemon
  • mysql-server – MySQL Catalog
  • bacula-client-linux (Debian Lenny) – File Daemon
  • bacula-client-win (WinXP) – File Daemon

Following, I note all commands that are necessary to install the mentioned scenarion.

Installation of bacula-server (Director, Storage Daemon, File Daemon)


bacula-server:~# aptitude install build-essential libpq-dev libncurses5-dev libssl-dev psmisc libmysqlclient-dev mysql-client
bacula-server:~# cd /usr/local/src
bacula-server:~# wget http://downloads.sourceforge.net/project/bacula/bacula/5.0.1/bacula-5.0.1.tar.gz
bacula-server:~# tar xzvf bacula-5.0.1.tar.gz
bacula-server:~# cd bacula-5.0.1

To simplify the configure process, I used a shellscript with all the options (also the ones recommended by the Bacula project)


#!/bin/sh
prefix=/opt/bacula
CFLAGS="-g -O2 -Wall" \
  ./configure \
    --sbindir=${prefix}/bin \
    --sysconfdir=${prefix}/etc \
    --docdir=${prefix}/html \
    --htmldir=${prefix}/html \
    --with-working-dir=${prefix}/working \
    --with-pid-dir=${prefix}/working \
    --with-subsys-dir=${prefix}/working \
    --with-scriptdir=${prefix}/scripts \
    --with-plugindir=${prefix}/plugins \
    --libdir=${prefix}/lib \
    --enable-smartalloc \
    --with-mysql \
    --enable-conio \
    --with-openssl \
    --with-smtp-host=localhost \
    --with-baseport=9101 \
    --with-dir-user=bacula \
    --with-dir-group=bacula \
    --with-sd-user=bacula \
    --with-sd-group=bacula \
    --with-fd-user=root \
    --with-fd-group=bacula

Paste the code above in a file, make it executable (chmod +x) and run it.

If everything worked fine, type:


bacula-server:~# make && make install

Now to the setup of baculas catalog database. In my case, I use MySQL as catalog background, because I already have some knowledge about it. Other databases are supported as well (i.e. Postgres).
Bacula comes with all necessary scripts to create the initial catalog database on a local MySQL instance (I recommend you to apt-get the MySQL server and leave the root PW empty during the bacula setup phase). To have it setup on a remote server, you just need to check out the scripts, strip away the shell stuff and copy&paste the statements to your DB server (Thats what I did).


bacula-server:~# groupadd bacula
bacula-server:~# useradd -g bacula -d /opt/bacula/working -s /bin/bash bacula
bacula-server:~# passwd bacula
bacula-server:~# chown root:bacula /opt/bacula
bacula-server:~# chown bacula:bacula /opt/bacula/working
bacula-server:~# mkdir /backup2disk && chown -R bacula:bacula /backup2disk
bacula-server:~# touch /var/log/bacula.log && chown bacula:bacula /var/log/bacula.log
bacula-server:~# chown bacula:bacula /opt/bacula/scripts/make_catalog_backup /opt/bacula/scripts/delete_catalog_backup
bacula-server:~# cp /opt/bacula/scripts/bacula-ctl-dir /etc/init.d/bacula-dir
bacula-server:~# cp /opt/bacula/scripts/bacula-ctl-sd /etc/init.d/bacula-sd
bacula-server:~# cp /opt/bacula/scripts/bacula-ctl-fd /etc/init.d/bacula-fd
bacula-server:~# chmod 755 /etc/init.d/bacula-*
bacula-server:~# update-rc.d bacula-sd defaults 91
bacula-server:~# update-rc.d bacula-fd defaults 92
bacula-server:~# update-rc.d bacula-dir defaults 90

The following configfiles contain my example config (rename bacula-server-bacula-fd.conf to bacula-fd.conf):

bacula-dir.conf
bacula-sd.conf
bacula-server-bacula-fd.conf
bconsole.conf

Installation of Bweb and Brestore on bacula-server

If you like to actually see whats happening with your backups whithout hacking away on the console, I recommend you to install Bweb.


bacula-server:~# aptitude install lighttpd ttf-dejavu-core libgd-graph-perl libhtml-template-perl libexpect-perl libdbd-pg-perl libdbi-perl libdate-calc-perl libtime-modules-perl
bacula-server:~# /etc/init.d/lighttpd stop
bacula-server:~# update-rc.d -f lighttpd remove
bacula-server:~# cd /var/www
bacula-server:~# wget http://downloads.sourceforge.net/project/bacula/bacula/5.0.1/bacula-gui-5.0.1.tar.gz
bacula-server:~# tar xzvf bacula-gui-5.0.1.tar.gz
bacula-server:~# ln -s /var/www/bacula-gui-5.0.1 /var/www/bacula-gui
bacula-server:~# cd /var/www/bacula-gui/bweb

This is my httpd.conf, which contains logging and authentication support:
bweb-httpd.conf


bacula-server:~# touch /var/log/lighttpd/access.log /var/log/lighttpd/error.log
bacula-server:~# chown -R bacula:bacula /var/log/lighttpd
bacula-server:~# ln -s /opt/bacula/bin/bconsole /usr/bin/bconsole
bacula-server:~# chown bacula:bacula /opt/bacula/bin/bconsole /opt/bacula/etc/bconsole.conf
bacula-server:~# chown -R bacula:bacula /var/www/bacula*
bacula-server:~# cd /var/www/bacula-gui/bweb/script
bacula-server:~# mysql -p -u bacula -h mysql-server bacula < bweb-mysql.sql
bacula-server:~# ./starthttp

After we start lighttpd for the first time, it creates the bweb.conf configfile, which we own to the bacula user:


bacula-server:~# chown bacula:bacula /var/www/bacula-gui/bweb/bweb.conf

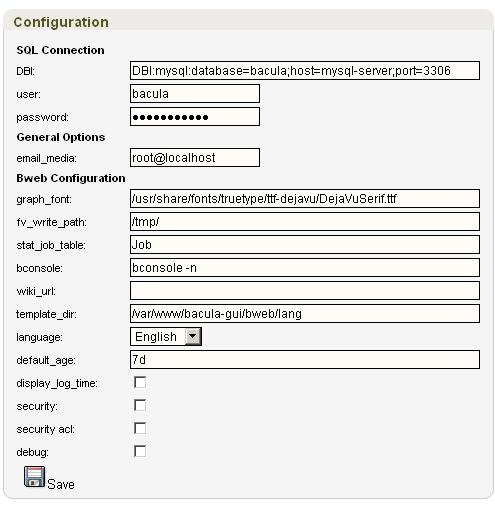
Now, open up a browser and navigate to the bweb page (lighttpd tells you where you can reach it after you start the service). Check out the following screenshot to see how to configure the Bweb instance:
If you also like to run restore jobs in a graphical manner, you can install the Brestore addon to your new Bweb interface.


bacula-server:~# aptitude install libdbd-pg-perl libexpect-perl libwww-perl libgtk2-gladexml-perl unzip
bacula-server:~# cd /var/www/bacula-gui/brestore
bacula-server:~# mkdir -p /usr/share/brestore
bacula-server:~# install -m 644 -o root -g root brestore.glade /usr/share/brestore
bacula-server:~# install -m 755 -o root -g root brestore.pl /usr/bin
bacula-server:~# cd /var/www/bacula-gui/bweb/html
bacula-server:~# wget http://www.extjs.com/deploy/ext-3.1.1.zip
bacula-server:~# unzip ext-3.1.1.zip
bacula-server:~# rm ext-3.1.1.zip
bacula-server:~# mv ext-3.1.1 ext
bacula-server:~# chown -R bacula:bacula ext
bacula-server:~# nano /etc/mime.types

Add a new MIME type:


text/brestore                                   brestore.pl

Restart the lighttpd server:


bacula-server:~# killall lighttpd
bacula-server:~# /var/www/bacula-gui/bweb/script/starthttp

Installation of bacula-client-linux (File Daemon)

I assume, you have a Debian Lenny system up and running.


bacula-client-linux:~# aptitude install build-essential libssl-dev
bacula-client-linux:~# cd /usr/local/src
bacula-client-linux:~# wget http://downloads.sourceforge.net/project/bacula/bacula/5.0.1/bacula-5.0.1.tar.gz
bacula-client-linux:~# tar xzvf bacula-5.0.1.tar.gz
bacula-client-linux:~# cd bacula-5.0.1

I also use a shellscript to configure our File Daemon, to make it more comfortable to deploy on multiple clients.


#!/bin/sh
prefix=/opt/bacula
CFLAGS="-g -O2 -Wall" \
  ./configure \
    --sbindir=${prefix}/bin \
    --sysconfdir=${prefix}/etc \
    --docdir=${prefix}/html \
    --htmldir=${prefix}/html \
    --with-working-dir=${prefix}/working \
    --with-pid-dir=${prefix}/working \
    --with-subsys-dir=${prefix}/working \
    --with-scriptdir=${prefix}/scripts \
    --with-plugindir=${prefix}/plugins \
    --libdir=${prefix}/lib \
    --enable-smartalloc \
    --with-openssl \
    --enable-client-only

bacula-client-linux:~# make && make install
bacula-client-linux:~# cp /opt/bacula/scripts/bacula-ctl-fd /etc/init.d/bacula-fd
bacula-client-linux:~# chmod 755 /etc/init.d/bacula-fd
bacula-client-linux:~# update-rc.d bacula-fd defaults 90

Finally, the configfile for our linux client (rename bacula-client-linux-bacula-fd.conf to bacula-fd.conf):

bacula-client-linux-bacula-fd.conf

Installation of bacula-client-win (File Daemon)

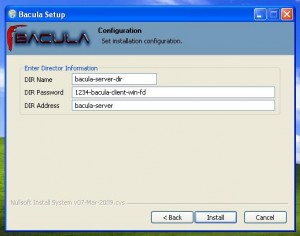
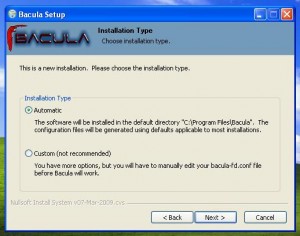
Get the windows binaries from the bacula page and make your way through the install dialogue:
Testing

Starting the Bacula services on bacula-server:


bacula-server:~# /etc/init.d/bacula-sd start
bacula-server:~# /etc/init.d/bacula-fd start
bacula-server:~# /etc/init.d/bacula-dir start

Starting the File Daemon on bacula-client-linux


bacula-client-linux:~# /etc/init.d/bacula-fd start

Bconsole Commands on bacula-server


bconsole
status
list clients
quit

Extended scenario – Tapelibrary on a separate server called “bacula-storage”
In this case, you don’t need to build the whole package. Apt-get the same packages as mentioned in the installation of bacula-server, get the bacula tarball, unpack and configure with the following script:

#!/bin/sh
prefix=/opt/bacula
CFLAGS="-g -O2 -Wall" \
  ./configure \
    --sbindir=${prefix}/bin \
    --sysconfdir=${prefix}/etc \
    --docdir=${prefix}/html \
    --htmldir=${prefix}/html \
    --with-working-dir=${prefix}/working \
    --with-pid-dir=${prefix}/working \
    --with-subsys-dir=${prefix}/working \
    --with-scriptdir=${prefix}/scripts \
    --with-plugindir=${prefix}/plugins \
    --libdir=${prefix}/lib \
    --enable-smartalloc \
    --with-mysql \
    --with-openssl \
    --with-smtp-host=localhost \
    --with-baseport=9101 \
    --disable-build-dird \
    --with-sd-user=bacula \
    --with-sd-group=bacula \
    --with-fd-user=root \
    --with-fd-group=bacula

2be continued with
– Bweb ssh remote command execution to show library status (reminder: don’t forget chmod g-w /opt/bacula/working)
– Extended configfiles

Hints
An Issue, that I noticed was, that brestore didn’t allow you to graphically drill down to the files you wanted to restore. You couldn’t click your way through the path but had to enter the path to the desired file by hand. It seems, that as soon as you back up another host, this problem resolves itself.

Links

Main manual: http://www.bacula.org/5.0.x-manuals/en/main/main/index.html

Ubuntu 9.10 and Windows 7 dualboot with a Fakeraid Controller

I recently tried to install Ubuntu Server 9.10 and Windows 7 in a dual boot configuration on a Promise FastTrak TX2300 SATA RAID1 array and unexpectedly ran into some problems.
It seems that the FastTrak TX2300 SATA RAID controller doesn’t have fully featured RAID options (see Fakeraid: https://help.ubuntu.com/community/FakeRaidHowto) an therefore needs a bit a different approach to make it do what you want.

Here I provide a manual on how I got my stuff working.

Installation of Ubuntu

  • Boot from the Ubuntu 9.10 Server install CD and start the setup
  • In order to use fakeraid arrays, we need the dmraid package; Ubuntu 9.10 already has it included.
  • Partition as usual (e.g. root filesystem with ext4, empty partition (for later Windows 7 installation), swap at end of harddrive)
  • GRUB installation will skip because it can’t write to the MBR, therefore pick “Continue without bootloader” from the installer menue

At this point, the system is not ready to boot. We will handle this later.
First, we continue with Windows 7.

Installation of Windows 7

  • Make your way through the installation and select your Windows 7 partition as installation target.
  • In case the created partition for Windows 7 should not be accepted as valid installation target, you can press Shift-F10 and use the “diskpart” utility to delete and recreate the Windows 7 partition (diskpart, list disk, select disk x, list partition, delete partition x, create partition)

After installing Windows 7, the system is usable (at least 50% of it), allowing you to boot into Windows 7. To be able to select between Ubuntu and Windows, we need to install GRUB, which we skipped in Step 1 and configure it accordingly.

Setting up GRUB

  • Boot from the Ubuntu 9.10 Server CD and enter the “Rescue a broken system” mode. As soon as you get to the Rescue mode switch to another console (e.g. Alt-F2)

mount /dev/mapper/pdc_bfihaijgha1 /mnt (replace with the name of your mapped Ubuntu root partition)
mount --bind /dev /mnt/dev/
mount -t proc proc /mnt/proc/
mount -t sysfs sys /mnt/sys/
chroot /mnt /bin/bash

In my case, I had to enable the CD-ROM as apt package source because I didn’t have a network connection on that computer:


nano /etc/apt/sources.list

and uncomment the line beginning with


"#deb cdrom:[Ubuntu-Server 9.10...."

Now you can install GRUB from the CD-ROM and set it up


apt-get install grub
cp /usr/lib/grub/i386-pc/* /boot/grub/

grub
grub> device (hd0) /dev/mapper/pdc_bfihaijgha (replace with the name of your mapped RAID volume)
grub> find /boot/grub/stage1
grub> root (hd0,0)
grub> setup (hd0)
grub> quit

update-grub (the menu.lst gets created for you)

Add the Windows 7 entry to menu.lst:


nano /boot/grub/menu.lst

and add the following lines to the bottom of the file


title Windows 7
rootnoverify (hd0,1)
makeactive
chainloader +1

here you can also adjust the bootmenue to show up without first pressing “Esc” (comment hidemenue) and change timers. After you have changed everything to your needs, you can restart the system and check if the bootmenue displays everything correctly and if all entries are working.

Setting file permissions using XCACLS

If you work with large quantities of files and have probably come across a situation where you had to modify file permissions, you know that the Explorer GUI is not much of a help. To relieve yourself from clicking your fingers to death, you could use XCACLS, which allows you to script file permission settings. XCACLS is also capable of creating listings of applying permissions.

As a first example on how to use XCACLS, I show you how to get a listing of all permissions applying to the folder c:\temp and its subs.

Grab yourself a copy of the XCACLS package from the MS site and go to Start > Run > cmd and cd to the path where you put xcacls.vbs and run the command below:

cscript xcacls.vbs "c:\temp\*"

The output you get, will look similar to this:


Microsoft (R) Windows Script Host Version 5.7
Copyright (C) Microsoft Corporation. All rights reserved.

Starting XCACLS.VBS (Version: 5.2) Script at x/x/2009 x:xx:xx PM

Startup directory:
"C:\"

Arguments Used:
	Filename = "c:\temp\*"
**************************************************************************
File: C:\temp\access.log

Permissions:
Type     Username                Permissions           Inheritance 

Allowed  BUILTIN\Administrators  Full Control          This Folder Only
Allowed  NT AUTHORITY\SYSTEM     Full Control          This Folder Only
Allowed  DOMAIN\user            Full Control          This Folder Only
Allowed  BUILTIN\Users           Read and Execute      This Folder Only      

No Auditing set

Owner: DOMAIN\user
**************************************************************************

Operation Complete
Elapsed Time: 0.1875 seconds.

Ending Script at x/x/2009 x:xx:xx PM

So far for the displaying of permissions.

As an example for turning on file permission inheritance in a directory tree, simply run:

cscript xcacls.vbs "c:\temp2\*" /I ENABLE /F /T /S

To conclude this post, this is how you specify the owner over a whole dir tree and all subcontents (please take care to invoke the /E parameter to tell XCACLS to only edit the ACL record, otherwise the ACL gets blanked out):

cscript xcacls.vbs "c:\temp2\*" /O username /F /T /S /E

How to use Xcacls.vbs to modify NTFS permissions
http://support.microsoft.com/?scid=kb%3Ben-us%3B825751&x=6&y=13

Adding scheduled tasks to Windows clients with GPO

In this example, I show how to add a scheduled job (taken from the article Shutting down an idle Windows computer) to multiple domain clients, using GPOs.

First, create a batch file (for example in %SystemRoot%\SYSVOL\domainname\scripts) with the following content:


schtasks /Create /RU System /TN "Shut down idle system" /SC ONIDLE /TR "C:\Windows\system32\shutdown.exe /s /f /t 0" /I 20

Open up the Group Policy Management console and add a new GPO. Go to Computer Configuration > Windows Settings > Scripts > Startup and add the newly created batch file. Now you just have to link the GPO to an OU which should be affected.

Windows XP Professional Product Documentation – Schtasks:
http://www.microsoft.com/resources/documentation/windows/xp/all/proddocs/en-us/schtasks.mspx?mfr=true

Shutting down an idle Windows computer

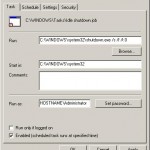
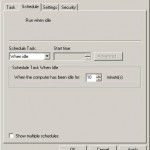
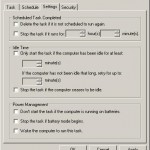
Shutting down an idle Windows XP computer, for example to save energy costs, can be done through the windows Task Scheduler. Just configure a new task according to the screen shots below (adjusting the parameters for shutdown.exe to your wishes – see the MS support link)

How To Use the Remote Shutdown Tool to Shut Down and Restart a Computer in Windows 2000: http://support.microsoft.com/kb/317371

BackupExec – Media sets vs. library partitioning

Introduction

In this article, I want to give a short overview of the advantages of using partitioning with backup libraries and Symantec’s BackupExec and hopefully bring a bit of transparency in how BackupExec determines, which media it will use for a given backup job.

Scenario

First we assume, we have a small company, which backs up its data every working day of the week – 4 times incremental (Monday, Tuesday, Wednesday, Thursday) and one time a full backup (Friday). The company uses a robotic library with 8 slots. The company wants to make sure, the backup types use different tapes, because the tapes with the Full backups are being stored at a safe location.

First attempt – Media sets

Now, how would you handle the backup plans, to have the incremental and the full backups separated from each other, to be able to archive the full backup tape-sets on a safe location?

You might think, you create two Media sets in the BackupExec Media pane, one named Full and the other named Incremental and then tell the backup jobs to use either Media set… But here is just where the problem starts.
After running the whole thing for some time, you might notice that either your Full or your Incremental Media set is empty and all tapes have shifted to the other media set.

Conclusion and Summary – Library partitioning vs. Media sets

BackupExec doesn’t handle the backup media like you might think, after just looking at it.
Media sets are intended to identify the data, stored on the tapes and not to identify the correct tapes for a job to be executed! To be really sure, to have your Backups separated, you need to enable partitioning on your backup library. Lets say, you configure slot 1 to 4 for the full backups and the slots 5 to 8 for the incremental ones. Works straight-forward, after the partitioning you can select of which partition the backup job should take its tapes.

Links

Creating, configuring, and targeting a backup job to a Robotic Library partition in Backup Exec For Windows Server
http://seer.entsupport.symantec.com/docs/262055.htm

List of ActiveDirectory User Attributes (2000 and 2003)

During my work as a system engineer I often come across situations, where I need to have an easy overview of an ActiveDirectories attribute names. To be a bit more independent of other sites, I decided to start with mirroring an attribute list from the MS KB.

Optional Attributes

accountExpires Value:9223372036854775807
cn (Container) Value:Nirmal
codePage Value:0
countryCode Value:536
displayName Value:Display Name
distinguishedName Value:CN=nirmal,CN=Users,DC=test,DC=local
instanceType Value:4
name Value:nirmal
objectCategory Value:CN=Person,CN=Schema,CN=Configuration,DC
uSNChanged Value:50203
uSNCreated Value:13920
whenChanged Value:2022552554552
whenCreated Value:2022554588585
logonHours Value:://///////////////////////////
userAccountControl Value:524802

Required Attributes

dn Value:CN=nirmal,CN=Users,DC=test,DC=local
objectClass Value:User
sAMAccountName Value:SAMLNAME

Attributes that can’t be imported into AD

badPasswordTime Value:1
badPwdCount Value:1
lastLogoff Value:0932479234902343
lastLogon Value:12924723489374737
logonCount Value:0
primaryGroupID Value:513
pwdLastSet Value:0
sAMAccountType Value:805306368
objectGUID Value::QT2p48fufjweue839384ufufj/A==
objectSid Value::
memberOf Value:CN=Domain Admins,

Other

department Value:GIS
co (Country Name) Value:India
comment
company Value:Computer Sciences Corporation
description Value:Description Field Cost Centre
directReports
lastLogonTimestamp
adminCount Value:1
ADsPath
c (2 digit country) Value:IN
dSCorePropagationData
facsimileTelephoneNumber
givenName
homeDirectory Value:\\amppfilerp01\hthrmg$
homeDrive Value:H:\
homePhone
info (Phone notes)
initials Value:INT
ipPhone
isCriticalSystemObject
l (City) Value:City Field
userCertificate
userParameters
userPrincipalName Value:LogonName@test.local
userWorkstations
wWWHomePage Value:Web Page Field
mail Value:Emailss@sss.com
manager
CN=Users,DC=Local,DC=C
mobile
msNPAllowDialin Value:FALSE
AQUQISJFAAAAAUISIRK@#!$KGFJG(#JFJDJSjs
otherFacsimileTelephoneNumber
otherHomePhone
otherIpPhone
profilePath Value:\\tqchain2k3pc\profiles\nirmal
otherMobile
otherPager
otherTelephone
pager
physicalDeliveryOfficeName Value:Office Name
postalCode Value:Zip Code
postOfficeBox Value:Post Office Box
scriptPath Value:qchain.vbs
servicePrincipalName
showInAdvancedViewOnly
sn (Surname) Value:Last Name Field
st (2 digit State / Province)
streetAddress
telephoneNumber
title
url

Taken from: http://support.microsoft.com/kb/555638
Further informations: http://support.microsoft.com/kb/257218
Information on ActiveDirectory attribute time/date conversion: http://support.microsoft.com/kb/555936