It’s now about two years ago, that I wondered “Why the … are we paying support and license subscriptions, if the only benefit is that you can listen to the support line music and get a new logo in the softwares main window after each update?”. Ok, the software works so far. But for every new client, you have to relicense and especially support for linux hosts can be a real pain.
I don’t want to call any names here nor start an argument with any fanboys. But being tired of all this commercial “corporate” softwares, I want to share my approach to installing the free and open source backup software Bacula.
Please feel free, to write me if you find possible errors or misconfigurations. I plan to extend this how-to with more detailled instructions.
Well, back to bacula: This overview visualizes the interactions of all bacula modules (taken from the bacula.org wiki)

To keep things simple, I start with a small but expandable test installation, consisting of one server and one or maybe two clients. In this case:
Hosts
- bacula-server (Debian Lenny) – Director, Storage Daemon, File Daemon
- mysql-server – MySQL Catalog
- bacula-client-linux (Debian Lenny) – File Daemon
- bacula-client-win (WinXP) – File Daemon
Following, I note all commands that are necessary to install the mentioned scenarion.
Installation of bacula-server (Director, Storage Daemon, File Daemon)
bacula-server:~# aptitude install build-essential libpq-dev libncurses5-dev libssl-dev psmisc libmysqlclient-dev mysql-client
bacula-server:~# cd /usr/local/src
bacula-server:~# wget http://downloads.sourceforge.net/project/bacula/bacula/5.0.1/bacula-5.0.1.tar.gz
bacula-server:~# tar xzvf bacula-5.0.1.tar.gz
bacula-server:~# cd bacula-5.0.1
To simplify the configure process, I used a shellscript with all the options (also the ones recommended by the Bacula project)
#!/bin/sh
prefix=/opt/bacula
CFLAGS="-g -O2 -Wall" \
  ./configure \
    --sbindir=${prefix}/bin \
    --sysconfdir=${prefix}/etc \
    --docdir=${prefix}/html \
    --htmldir=${prefix}/html \
    --with-working-dir=${prefix}/working \
    --with-pid-dir=${prefix}/working \
    --with-subsys-dir=${prefix}/working \
    --with-scriptdir=${prefix}/scripts \
    --with-plugindir=${prefix}/plugins \
    --libdir=${prefix}/lib \
    --enable-smartalloc \
    --with-mysql \
    --enable-conio \
    --with-openssl \
    --with-smtp-host=localhost \
    --with-baseport=9101 \
    --with-dir-user=bacula \
    --with-dir-group=bacula \
    --with-sd-user=bacula \
    --with-sd-group=bacula \
    --with-fd-user=root \
    --with-fd-group=bacula
Paste the code above in a file, make it executable (chmod +x) and run it.
If everything worked fine, type:
bacula-server:~# make && make install
Now to the setup of baculas catalog database. In my case, I use MySQL as catalog background, because I already have some knowledge about it. Other databases are supported as well (i.e. Postgres).
Bacula comes with all necessary scripts to create the initial catalog database on a local MySQL instance (I recommend you to apt-get the MySQL server and leave the root PW empty during the bacula setup phase). To have it setup on a remote server, you just need to check out the scripts, strip away the shell stuff and copy&paste the statements to your DB server (Thats what I did).
bacula-server:~# groupadd bacula
bacula-server:~# useradd -g bacula -d /opt/bacula/working -s /bin/bash bacula
bacula-server:~# passwd bacula
bacula-server:~# chown root:bacula /opt/bacula
bacula-server:~# chown bacula:bacula /opt/bacula/working
bacula-server:~# mkdir /backup2disk && chown -R bacula:bacula /backup2disk
bacula-server:~# touch /var/log/bacula.log && chown bacula:bacula /var/log/bacula.log
bacula-server:~# chown bacula:bacula /opt/bacula/scripts/make_catalog_backup /opt/bacula/scripts/delete_catalog_backup
bacula-server:~# cp /opt/bacula/scripts/bacula-ctl-dir /etc/init.d/bacula-dir
bacula-server:~# cp /opt/bacula/scripts/bacula-ctl-sd /etc/init.d/bacula-sd
bacula-server:~# cp /opt/bacula/scripts/bacula-ctl-fd /etc/init.d/bacula-fd
bacula-server:~# chmod 755 /etc/init.d/bacula-*
bacula-server:~# update-rc.d bacula-sd defaults 91
bacula-server:~# update-rc.d bacula-fd defaults 92
bacula-server:~# update-rc.d bacula-dir defaults 90
The following configfiles contain my example config (rename bacula-server-bacula-fd.conf to bacula-fd.conf):
bacula-dir.conf
bacula-sd.conf
bacula-server-bacula-fd.conf
bconsole.conf
Installation of Bweb and Brestore on bacula-server
If you like to actually see whats happening with your backups whithout hacking away on the console, I recommend you to install Bweb.
bacula-server:~# aptitude install lighttpd ttf-dejavu-core libgd-graph-perl libhtml-template-perl libexpect-perl libdbd-pg-perl libdbi-perl libdate-calc-perl libtime-modules-perl
bacula-server:~# /etc/init.d/lighttpd stop
bacula-server:~# update-rc.d -f lighttpd remove
bacula-server:~# cd /var/www
bacula-server:~# wget http://downloads.sourceforge.net/project/bacula/bacula/5.0.1/bacula-gui-5.0.1.tar.gz
bacula-server:~# tar xzvf bacula-gui-5.0.1.tar.gz
bacula-server:~# ln -s /var/www/bacula-gui-5.0.1 /var/www/bacula-gui
bacula-server:~# cd /var/www/bacula-gui/bweb
This is my httpd.conf, which contains logging and authentication support:
bweb-httpd.conf
bacula-server:~# touch /var/log/lighttpd/access.log /var/log/lighttpd/error.log
bacula-server:~# chown -R bacula:bacula /var/log/lighttpd
bacula-server:~# ln -s /opt/bacula/bin/bconsole /usr/bin/bconsole
bacula-server:~# chown bacula:bacula /opt/bacula/bin/bconsole /opt/bacula/etc/bconsole.conf
bacula-server:~# chown -R bacula:bacula /var/www/bacula*
bacula-server:~# cd /var/www/bacula-gui/bweb/script
bacula-server:~# mysql -p -u bacula -h mysql-server bacula < bweb-mysql.sql
bacula-server:~# ./starthttp
After we start lighttpd for the first time, it creates the bweb.conf configfile, which we own to the bacula user:
bacula-server:~# chown bacula:bacula /var/www/bacula-gui/bweb/bweb.conf
Now, open up a browser and navigate to the bweb page (lighttpd tells you where you can reach it after you start the service). Check out the following screenshot to see how to configure the Bweb instance:
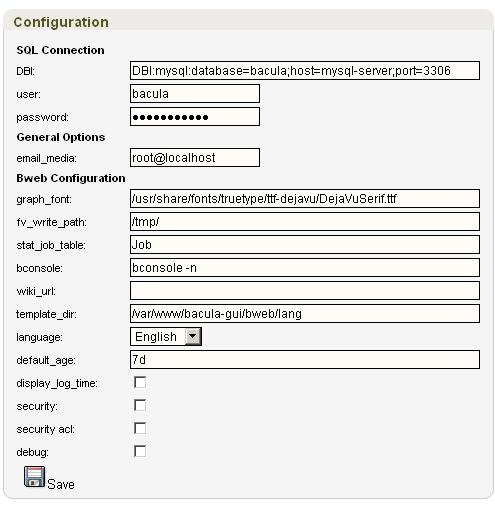
If you also like to run restore jobs in a graphical manner, you can install the Brestore addon to your new Bweb interface.
bacula-server:~# aptitude install libdbd-pg-perl libexpect-perl libwww-perl libgtk2-gladexml-perl unzip
bacula-server:~# cd /var/www/bacula-gui/brestore
bacula-server:~# mkdir -p /usr/share/brestore
bacula-server:~# install -m 644 -o root -g root brestore.glade /usr/share/brestore
bacula-server:~# install -m 755 -o root -g root brestore.pl /usr/bin
bacula-server:~# cd /var/www/bacula-gui/bweb/html
bacula-server:~# wget http://www.extjs.com/deploy/ext-3.1.1.zip
bacula-server:~# unzip ext-3.1.1.zip
bacula-server:~# rm ext-3.1.1.zip
bacula-server:~# mv ext-3.1.1 ext
bacula-server:~# chown -R bacula:bacula ext
bacula-server:~# nano /etc/mime.types
Add a new MIME type:
text/brestore brestore.pl
Restart the lighttpd server:
bacula-server:~# killall lighttpd
bacula-server:~# /var/www/bacula-gui/bweb/script/starthttp
Installation of bacula-client-linux (File Daemon)
I assume, you have a Debian Lenny system up and running.
bacula-client-linux:~# aptitude install build-essential libssl-dev
bacula-client-linux:~# cd /usr/local/src
bacula-client-linux:~# wget http://downloads.sourceforge.net/project/bacula/bacula/5.0.1/bacula-5.0.1.tar.gz
bacula-client-linux:~# tar xzvf bacula-5.0.1.tar.gz
bacula-client-linux:~# cd bacula-5.0.1
I also use a shellscript to configure our File Daemon, to make it more comfortable to deploy on multiple clients.
#!/bin/sh
prefix=/opt/bacula
CFLAGS="-g -O2 -Wall" \
  ./configure \
    --sbindir=${prefix}/bin \
    --sysconfdir=${prefix}/etc \
    --docdir=${prefix}/html \
    --htmldir=${prefix}/html \
    --with-working-dir=${prefix}/working \
    --with-pid-dir=${prefix}/working \
    --with-subsys-dir=${prefix}/working \
    --with-scriptdir=${prefix}/scripts \
    --with-plugindir=${prefix}/plugins \
    --libdir=${prefix}/lib \
    --enable-smartalloc \
    --with-openssl \
    --enable-client-only
bacula-client-linux:~# make && make install
bacula-client-linux:~# cp /opt/bacula/scripts/bacula-ctl-fd /etc/init.d/bacula-fd
bacula-client-linux:~# chmod 755 /etc/init.d/bacula-fd
bacula-client-linux:~# update-rc.d bacula-fd defaults 90
Finally, the configfile for our linux client (rename bacula-client-linux-bacula-fd.conf to bacula-fd.conf):
bacula-client-linux-bacula-fd.conf
Installation of bacula-client-win (File Daemon)
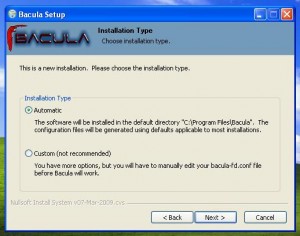
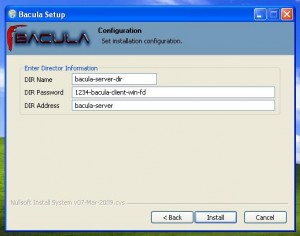
Get the windows binaries from the bacula page and make your way through the install dialogue:
Testing
Starting the Bacula services on bacula-server:
bacula-server:~# /etc/init.d/bacula-sd start
bacula-server:~# /etc/init.d/bacula-fd start
bacula-server:~# /etc/init.d/bacula-dir start
Starting the File Daemon on bacula-client-linux
bacula-client-linux:~# /etc/init.d/bacula-fd start
Bconsole Commands on bacula-server
bconsole
status
list clients
quit
Extended scenario – Tapelibrary on a separate server called “bacula-storage”
In this case, you don’t need to build the whole package. Apt-get the same packages as mentioned in the installation of bacula-server, get the bacula tarball, unpack and configure with the following script:
#!/bin/sh
prefix=/opt/bacula
CFLAGS="-g -O2 -Wall" \
  ./configure \
    --sbindir=${prefix}/bin \
    --sysconfdir=${prefix}/etc \
    --docdir=${prefix}/html \
    --htmldir=${prefix}/html \
    --with-working-dir=${prefix}/working \
    --with-pid-dir=${prefix}/working \
    --with-subsys-dir=${prefix}/working \
    --with-scriptdir=${prefix}/scripts \
    --with-plugindir=${prefix}/plugins \
    --libdir=${prefix}/lib \
    --enable-smartalloc \
    --with-mysql \
    --with-openssl \
    --with-smtp-host=localhost \
    --with-baseport=9101 \
    --disable-build-dird \
    --with-sd-user=bacula \
    --with-sd-group=bacula \
    --with-fd-user=root \
    --with-fd-group=bacula
2be continued with
– Bweb ssh remote command execution to show library status (reminder: don’t forget chmod g-w /opt/bacula/working)
– Extended configfiles
Hints
An Issue, that I noticed was, that brestore didn’t allow you to graphically drill down to the files you wanted to restore. You couldn’t click your way through the path but had to enter the path to the desired file by hand. It seems, that as soon as you back up another host, this problem resolves itself.
Links
Main manual: http://www.bacula.org/5.0.x-manuals/en/main/main/index.html


