Monitoring ESX servers with Zabbix

Install the Zabbix monitoring agent binaries
Installing the Zabbix agent is quite simple, you could try the RedHat RPMs… I tried with the generic Linux 2.6.x binaries and it worked.
The only thing you have to consider, that the ESX console doesn’t come with wget, so you probably will have to SCP the rpm package to your ESX server.

Create a Firewall rule for the in- and outbound monitoring ports used by Zabbix
There are two ways of doing that:

  1. Issuing the following commands on the ESX command console – nice, but annoying for more that two ESXes:
    esxcfg-firewall -openPort 10050,tcp,in,zabbixClient
    esxcfg-firewall -openPort 10051,tcp,out,zabbixServer
  2. Or creating a XML file which holds the definition of the rule, which later allows more convenient handling (activating or deactivating) of the rule through the vSphere Client GUI – neat for larger farms of ESX servers.

Here is what you need to do to implement the second option (works for ESX 4):

  • Connect to the ESX console and create a new XML file in /etc/vmware/firewall called zabbixMonitoring.xml
  • Contents of /etc/vmware/firewall/zabbixMonitoring.xml:
  • 
    <!-- Firewall configuration information for Zabbix Monitoring system -->
    <ConfigRoot>
     <service>
     <id>zabbixMonitoring</id>
     <rule id='0000'>
     <direction>inbound</direction>
     <protocol>tcp</protocol>
     <port type='dst'>10050</port>
     <flags>-m state --state NEW</flags>
     </rule>
     <rule id='0001'>
     <direction>outbound</direction>
     <protocol>tcp</protocol>
     <port type='dst'>10051</port>
     <flags>-m state --state NEW</flags>
     </rule>
     </service>
    </ConfigRoot>
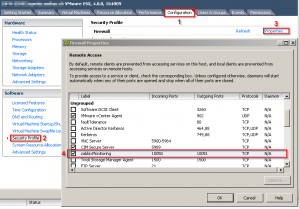
    
  • Restart the VMware management service: service mgmt-vmware restart
  • Connect to the ESX server and enable the Zabbix Monitoring rule in the vSphere Client GUI

The painless way to handle VMware ESX snapshots

If you work with virtual machines, you most likely already played around with snapshots. Its a really handy feature which lets you roll-back to a earlier stage of the lifetime of a system, just in case something goes wrong. During the extended lifetime of some VMs there might accumulate quite numerous snapshots which bloat the folder of the VM noticeably. One might think, that he just deletes the old snaps through ssh console access and the sky is blue again…?

If you just delete the old stuff by ssh console, you might run into some serious pains. The way here is merging the snapshots back to the vmdk. The way through the vSphere Client is the following: “Right-click on VM -> Snapshot -> Snapshot Manager -> Delete all”. Here is also where the trouble can start, in case you run out of storage. The way the snapshots get merged is the following:

Assume we have three snapshots:
Snap m, Size x
Snap n, Size y
Snap p, Size z

Step 1 of the merge:

  • Snap n transforms to Snap mn, Size x+y
  • Snap m deleted

Step2 of the merge:

  • Snap p transforms to Snap mnp, Size x+y+z
  • Snap mn deleted

Step3 of the merge:

  • Snap mnp gets merged with originating vmdk
  • Snap mnp deleted

So if you’re really tight in disk space, you might try to delete snapshot by snapshot instead of the “Delete all” option, starting with the newest.

If you have messed up totally and can’t delete the snapshots, a last effort could be to attach a Harddrive to your physical system (e.g. USB, eSATA you name it…) and use the VMware Converter to clone away the messed up VM in a clean vmdk.

The conclusion here is to carefully use snapshots and merging them proactively, avoiding to have too much system states flying around.

Useful links
Here you can find some backgrounds on snapshots: http://kb.vmware.com/selfservice/microsites/search.do?language=en_US&cmd=displayKC&externalId=1015180
KB article about running out of disk space during snapshot merge: http://kb.vmware.com/selfservice/microsites/search.do?language=en_US&cmd=displayKC&externalId=1003302

Resizing a VMware vmdk image

If you have to enlarge a VMware server vmdk- file, do the following if your VMware server runs on windows:

  1. Make sure, the VM is not running
  2. Remove or commit any snapshots of the VM
  3. Open a command prompt and cd to this path:
    C:\Program Files\VMWare\VMWare Server
  4. Run this command:
    vmware- vdiskmanager -x XGB “PATHTOIMAGE.vmdk”
    (replace XGB with the new size e.g. 30GB and PATHTOIMAGE with the path to the vmdk- file)
  5. Power up your VM and adjust the partition sizes
    (for example with the open source tool GParted)