Logon scripts with KiXtart

To follow up one of my previous posts (Mapping of network drives via batchfile), here is how you also could solve this kind of task using KiXtart. KiXtart is a free-format scripting language which allows to automate extensive configuration tasks, for example, but not limited to windows logon events.

Installation of KiXtart is quite simple, just get the binary, place it somewhere useful (i.e. the NETLOGON share in Windows domain environments) and edit the user accounts to use it as logon script (or write a batch logon script which calls the Kix binary).

Below is how i solved the problem of having a large list of available shares automatically checked if the user has permission to use them and if so to connect them to his computer.

I presume, you have Windows Security Groups in place, which use the same name as the shared folders.


; =============
;
; Dynamic share mapping script
;
; Author: Looke, 2010
; Filename: kixtart.kix
;
; Outline:
; * Iterates through the ServerDrives array, determines wether the
;   user is in the appropriate security group or not and maps
;   the network drive to a driveletter specified in the DriveLetters
;   array.
;
; =============

; -------------
; Admin configurable
; -------------

; Array of available groupshares
$ServerDrives = "\\SRV01\Share1",
		"\\SRV02\Share1"

; Array of available drive letters
$DriveLetters = "V:", "W:", "X:", "Y:", "Z:"

; -------------
; Better leave untouched
; -------------

; Iterator for the DriveLetters array
$DriveLetterIndex = 0

; -------------
; Removing current mappings
; -------------

; Removing mapped groupshares
FOR EACH $DriveLetter in $DriveLetters
	USE $DriveLetter /DELETE
NEXT

; -------------
; Mapping of groupshares
; -------------

; Dynamic mapping of groupshares
FOR EACH $ServerDrive in $ServerDrives

	; Getting the name of the shared folder
	; (which also is the name of the Windows Security Group)
	$Group = SPLIT($ServerDrive, "\")

	IF INGROUP($Group[3])
		USE $DriveLetters[0+$DriveLetterIndex] $ServerDrive
		IF @ERROR
			? "Failed with errorcode " + @ERROR
			  + " while mapping "
			  + $ServerDrive + " to "
			  + $DriveLetters[0+$DriveLetterIndex]
		ELSE
			? "Successfully mapped "
			  + $ServerDrive + " to "
			  + $DriveLetters[0+$DriveLetterIndex]
			$DriveLetterIndex = $DriveLetterIndex+1
		ENDIF
	ENDIF
NEXT

In my script, I didn’t make the mappings persistent. So, if you intend to also have users with laptops and a after-login VPN solution to connect to your servers, you might need to add the /PERSISTENT switch to the USE command(s).

Something else, which might be useful, is logging of logon events, as fiddling around with the windows security logs can be a bit of a pain. Missing in the script above, but can easily be integrated:


; Path to the logon logfiles (make sure, users can write to this path)
$LogPath = "\\SRV01\LOG$"

; Filenames and Paths of logon logfiles
$LogFile = "$LogPath\@WKSTA.log"

; Content of logon logfile
$LogText = "Date: @MDAYNO.@MONTHNO.@YEAR, @TIME" + CHR(13) + CHR(10) + 
	   "User: @USERID" + CHR(13) + CHR(10) + 
	   "Workstation: @WKSTA" + CHR(13) + CHR(10) + 
	   "IPs: @IPADDRESS0, @IPADDRESS1" + CHR(13) + CHR(10) + 
	   "MAC address: @ADDRESS" + CHR(13) + CHR(10) +
	   "-----------------------------------" + CHR(13) + CHR(10)

; Open, write and close Logfile
$LogError = OPEN(5, $LogFile, 5)
IF $LogError = 0
	$RES = WRITELINE(5, $LogText)
	$RES = CLOSE(5)
ENDIF 

A manual to using KiX can be found here:
http://www.kixtart.org/manual/

Monitoring a remote network interface with tcpdump and Wireshark

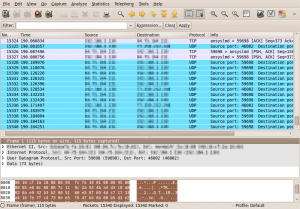
In this small how-to, I’ll show how to capture network traffic from a remote system to analyze it using Wireshark.

All you need is tcpdump on the remote machine, where you want to dump the network traffic off and Wireshark on the computer, you want to use to look at the packets flying around.
I use this setup for checking, whats going on on my IPcop firewall.

First, you need to prepare a named pipe on you monitoring station:


mkfifo /tmp/pipe

After this, we build up the connection to the remote system, issue the tcpdump command there and direct all outputs to the pipe:


ssh root@10.1.1.254 "tcpdump -i eth0 -s 0 -U -w - not port 22" > /tmp/pipe

Now switch to another console and start Wireshark, listening to our newly created pipe:


wireshark -k -i /tmp/pipe

After Wireshark has started, the ssh console will ask for roots password. After you entered it, you will see the packets getting listed in Wiresharks main screen.

Used tcpdump options

  • -i eth0 specifies the interface to capture from (change to your needs)
  • -s 0 sets the packet snapshot lenght it to the default of 65535, for backwards compatibility with recent older versions of tcpdump
  • -U writes each incoming packet to the file (or std. out) immediately, instead of waiting until the buffer has filled
  • -w – writes to standard output
  • not port 22 keeps tcpdump from returning the traffic we create with our ssh connection

Further info
http://wiki.wireshark.org/CaptureSetup/Pipes
http://www.tcpdump.org/tcpdump_man.html

Deploying the open-source backup solution Bacula

It’s now about two years ago, that I wondered “Why the … are we paying support and license subscriptions, if the only benefit is that you can listen to the support line music and get a new logo in the softwares main window after each update?”. Ok, the software works so far. But for every new client, you have to relicense and especially support for linux hosts can be a real pain.

I don’t want to call any names here nor start an argument with any fanboys. But being tired of all this commercial “corporate” softwares, I want to share my approach to installing the free and open source backup software Bacula.

Please feel free, to write me if you find possible errors or misconfigurations. I plan to extend this how-to with more detailled instructions.

Well, back to bacula: This overview visualizes the interactions of all bacula modules (taken from the bacula.org wiki)

To keep things simple, I start with a small but expandable test installation, consisting of one server and one or maybe two clients. In this case:

Hosts

  • bacula-server (Debian Lenny) – Director, Storage Daemon, File Daemon
  • mysql-server – MySQL Catalog
  • bacula-client-linux (Debian Lenny) – File Daemon
  • bacula-client-win (WinXP) – File Daemon

Following, I note all commands that are necessary to install the mentioned scenarion.

Installation of bacula-server (Director, Storage Daemon, File Daemon)


bacula-server:~# aptitude install build-essential libpq-dev libncurses5-dev libssl-dev psmisc libmysqlclient-dev mysql-client
bacula-server:~# cd /usr/local/src
bacula-server:~# wget http://downloads.sourceforge.net/project/bacula/bacula/5.0.1/bacula-5.0.1.tar.gz
bacula-server:~# tar xzvf bacula-5.0.1.tar.gz
bacula-server:~# cd bacula-5.0.1

To simplify the configure process, I used a shellscript with all the options (also the ones recommended by the Bacula project)


#!/bin/sh
prefix=/opt/bacula
CFLAGS="-g -O2 -Wall" \
  ./configure \
    --sbindir=${prefix}/bin \
    --sysconfdir=${prefix}/etc \
    --docdir=${prefix}/html \
    --htmldir=${prefix}/html \
    --with-working-dir=${prefix}/working \
    --with-pid-dir=${prefix}/working \
    --with-subsys-dir=${prefix}/working \
    --with-scriptdir=${prefix}/scripts \
    --with-plugindir=${prefix}/plugins \
    --libdir=${prefix}/lib \
    --enable-smartalloc \
    --with-mysql \
    --enable-conio \
    --with-openssl \
    --with-smtp-host=localhost \
    --with-baseport=9101 \
    --with-dir-user=bacula \
    --with-dir-group=bacula \
    --with-sd-user=bacula \
    --with-sd-group=bacula \
    --with-fd-user=root \
    --with-fd-group=bacula

Paste the code above in a file, make it executable (chmod +x) and run it.

If everything worked fine, type:


bacula-server:~# make && make install

Now to the setup of baculas catalog database. In my case, I use MySQL as catalog background, because I already have some knowledge about it. Other databases are supported as well (i.e. Postgres).
Bacula comes with all necessary scripts to create the initial catalog database on a local MySQL instance (I recommend you to apt-get the MySQL server and leave the root PW empty during the bacula setup phase). To have it setup on a remote server, you just need to check out the scripts, strip away the shell stuff and copy&paste the statements to your DB server (Thats what I did).


bacula-server:~# groupadd bacula
bacula-server:~# useradd -g bacula -d /opt/bacula/working -s /bin/bash bacula
bacula-server:~# passwd bacula
bacula-server:~# chown root:bacula /opt/bacula
bacula-server:~# chown bacula:bacula /opt/bacula/working
bacula-server:~# mkdir /backup2disk && chown -R bacula:bacula /backup2disk
bacula-server:~# touch /var/log/bacula.log && chown bacula:bacula /var/log/bacula.log
bacula-server:~# chown bacula:bacula /opt/bacula/scripts/make_catalog_backup /opt/bacula/scripts/delete_catalog_backup
bacula-server:~# cp /opt/bacula/scripts/bacula-ctl-dir /etc/init.d/bacula-dir
bacula-server:~# cp /opt/bacula/scripts/bacula-ctl-sd /etc/init.d/bacula-sd
bacula-server:~# cp /opt/bacula/scripts/bacula-ctl-fd /etc/init.d/bacula-fd
bacula-server:~# chmod 755 /etc/init.d/bacula-*
bacula-server:~# update-rc.d bacula-sd defaults 91
bacula-server:~# update-rc.d bacula-fd defaults 92
bacula-server:~# update-rc.d bacula-dir defaults 90

The following configfiles contain my example config (rename bacula-server-bacula-fd.conf to bacula-fd.conf):

bacula-dir.conf
bacula-sd.conf
bacula-server-bacula-fd.conf
bconsole.conf

Installation of Bweb and Brestore on bacula-server

If you like to actually see whats happening with your backups whithout hacking away on the console, I recommend you to install Bweb.


bacula-server:~# aptitude install lighttpd ttf-dejavu-core libgd-graph-perl libhtml-template-perl libexpect-perl libdbd-pg-perl libdbi-perl libdate-calc-perl libtime-modules-perl
bacula-server:~# /etc/init.d/lighttpd stop
bacula-server:~# update-rc.d -f lighttpd remove
bacula-server:~# cd /var/www
bacula-server:~# wget http://downloads.sourceforge.net/project/bacula/bacula/5.0.1/bacula-gui-5.0.1.tar.gz
bacula-server:~# tar xzvf bacula-gui-5.0.1.tar.gz
bacula-server:~# ln -s /var/www/bacula-gui-5.0.1 /var/www/bacula-gui
bacula-server:~# cd /var/www/bacula-gui/bweb

This is my httpd.conf, which contains logging and authentication support:
bweb-httpd.conf


bacula-server:~# touch /var/log/lighttpd/access.log /var/log/lighttpd/error.log
bacula-server:~# chown -R bacula:bacula /var/log/lighttpd
bacula-server:~# ln -s /opt/bacula/bin/bconsole /usr/bin/bconsole
bacula-server:~# chown bacula:bacula /opt/bacula/bin/bconsole /opt/bacula/etc/bconsole.conf
bacula-server:~# chown -R bacula:bacula /var/www/bacula*
bacula-server:~# cd /var/www/bacula-gui/bweb/script
bacula-server:~# mysql -p -u bacula -h mysql-server bacula < bweb-mysql.sql
bacula-server:~# ./starthttp

After we start lighttpd for the first time, it creates the bweb.conf configfile, which we own to the bacula user:


bacula-server:~# chown bacula:bacula /var/www/bacula-gui/bweb/bweb.conf

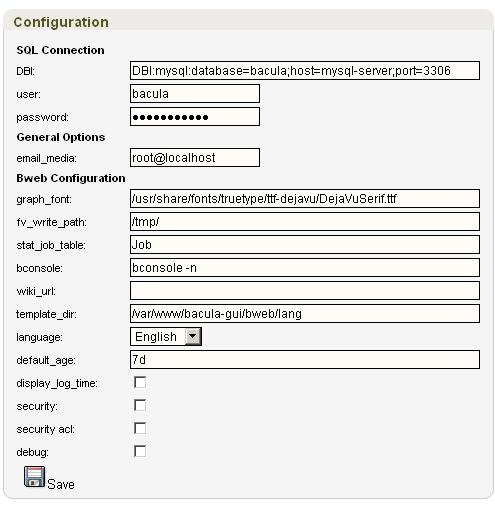
Now, open up a browser and navigate to the bweb page (lighttpd tells you where you can reach it after you start the service). Check out the following screenshot to see how to configure the Bweb instance:
If you also like to run restore jobs in a graphical manner, you can install the Brestore addon to your new Bweb interface.


bacula-server:~# aptitude install libdbd-pg-perl libexpect-perl libwww-perl libgtk2-gladexml-perl unzip
bacula-server:~# cd /var/www/bacula-gui/brestore
bacula-server:~# mkdir -p /usr/share/brestore
bacula-server:~# install -m 644 -o root -g root brestore.glade /usr/share/brestore
bacula-server:~# install -m 755 -o root -g root brestore.pl /usr/bin
bacula-server:~# cd /var/www/bacula-gui/bweb/html
bacula-server:~# wget http://www.extjs.com/deploy/ext-3.1.1.zip
bacula-server:~# unzip ext-3.1.1.zip
bacula-server:~# rm ext-3.1.1.zip
bacula-server:~# mv ext-3.1.1 ext
bacula-server:~# chown -R bacula:bacula ext
bacula-server:~# nano /etc/mime.types

Add a new MIME type:


text/brestore                                   brestore.pl

Restart the lighttpd server:


bacula-server:~# killall lighttpd
bacula-server:~# /var/www/bacula-gui/bweb/script/starthttp

Installation of bacula-client-linux (File Daemon)

I assume, you have a Debian Lenny system up and running.


bacula-client-linux:~# aptitude install build-essential libssl-dev
bacula-client-linux:~# cd /usr/local/src
bacula-client-linux:~# wget http://downloads.sourceforge.net/project/bacula/bacula/5.0.1/bacula-5.0.1.tar.gz
bacula-client-linux:~# tar xzvf bacula-5.0.1.tar.gz
bacula-client-linux:~# cd bacula-5.0.1

I also use a shellscript to configure our File Daemon, to make it more comfortable to deploy on multiple clients.


#!/bin/sh
prefix=/opt/bacula
CFLAGS="-g -O2 -Wall" \
  ./configure \
    --sbindir=${prefix}/bin \
    --sysconfdir=${prefix}/etc \
    --docdir=${prefix}/html \
    --htmldir=${prefix}/html \
    --with-working-dir=${prefix}/working \
    --with-pid-dir=${prefix}/working \
    --with-subsys-dir=${prefix}/working \
    --with-scriptdir=${prefix}/scripts \
    --with-plugindir=${prefix}/plugins \
    --libdir=${prefix}/lib \
    --enable-smartalloc \
    --with-openssl \
    --enable-client-only

bacula-client-linux:~# make && make install
bacula-client-linux:~# cp /opt/bacula/scripts/bacula-ctl-fd /etc/init.d/bacula-fd
bacula-client-linux:~# chmod 755 /etc/init.d/bacula-fd
bacula-client-linux:~# update-rc.d bacula-fd defaults 90

Finally, the configfile for our linux client (rename bacula-client-linux-bacula-fd.conf to bacula-fd.conf):

bacula-client-linux-bacula-fd.conf

Installation of bacula-client-win (File Daemon)

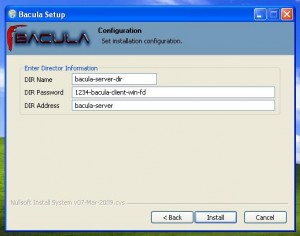
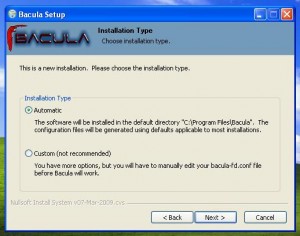
Get the windows binaries from the bacula page and make your way through the install dialogue:
Testing

Starting the Bacula services on bacula-server:


bacula-server:~# /etc/init.d/bacula-sd start
bacula-server:~# /etc/init.d/bacula-fd start
bacula-server:~# /etc/init.d/bacula-dir start

Starting the File Daemon on bacula-client-linux


bacula-client-linux:~# /etc/init.d/bacula-fd start

Bconsole Commands on bacula-server


bconsole
status
list clients
quit

Extended scenario – Tapelibrary on a separate server called “bacula-storage”
In this case, you don’t need to build the whole package. Apt-get the same packages as mentioned in the installation of bacula-server, get the bacula tarball, unpack and configure with the following script:

#!/bin/sh
prefix=/opt/bacula
CFLAGS="-g -O2 -Wall" \
  ./configure \
    --sbindir=${prefix}/bin \
    --sysconfdir=${prefix}/etc \
    --docdir=${prefix}/html \
    --htmldir=${prefix}/html \
    --with-working-dir=${prefix}/working \
    --with-pid-dir=${prefix}/working \
    --with-subsys-dir=${prefix}/working \
    --with-scriptdir=${prefix}/scripts \
    --with-plugindir=${prefix}/plugins \
    --libdir=${prefix}/lib \
    --enable-smartalloc \
    --with-mysql \
    --with-openssl \
    --with-smtp-host=localhost \
    --with-baseport=9101 \
    --disable-build-dird \
    --with-sd-user=bacula \
    --with-sd-group=bacula \
    --with-fd-user=root \
    --with-fd-group=bacula

2be continued with
– Bweb ssh remote command execution to show library status (reminder: don’t forget chmod g-w /opt/bacula/working)
– Extended configfiles

Hints
An Issue, that I noticed was, that brestore didn’t allow you to graphically drill down to the files you wanted to restore. You couldn’t click your way through the path but had to enter the path to the desired file by hand. It seems, that as soon as you back up another host, this problem resolves itself.

Links

Main manual: http://www.bacula.org/5.0.x-manuals/en/main/main/index.html
Adding KML Tracklogs to a Google Map

I finally got my hands on a GPS Track logger device (Holux M-241, a very nice gadget by the way) and thought to myself, it would be nice, if I could take those KML track log files and just upload them somewhere to make them available to be viewed on a web page. This is what came out as a first lazy sample:

https://looke.ch/kmloverlay/
You can find the source here: https://looke.ch/kmloverlay/source.php

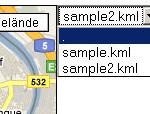
It basically looks for KML files in a folder, which you define and puts them in a select box. Here you can select the file you want to have drawn on the Map. Very basic functionality, but its a start at least. Probably I will continue to add new stuff to it (like a description of the track logs or comments etc.)

The main part of this sample is Googles GGeoXml class, which allows to pass a publicly available KML to the Google Maps API:


map = new GMap2(MapElement);
geoXml = new GGeoXml(KMLurl);
map.addOverlay(geoXml);


UPDATE:
In order to preserve the usability on mobile devices (e.g. Android phones), I added some JS to load a different style for devices with screens that are less than 320px wide:


if (screen.width <= 320) {
document.write('<style type="text/css">div#map{width: 300px; height: 310px;}</style>');
}
else {
document.write('<style type="text/css">div#map{width: 640px; height: 480px;}</style>');
}

Ubuntu 9.10 and Windows 7 dualboot with a Fakeraid Controller

I recently tried to install Ubuntu Server 9.10 and Windows 7 in a dual boot configuration on a Promise FastTrak TX2300 SATA RAID1 array and unexpectedly ran into some problems.
It seems that the FastTrak TX2300 SATA RAID controller doesn’t have fully featured RAID options (see Fakeraid: https://help.ubuntu.com/community/FakeRaidHowto) an therefore needs a bit a different approach to make it do what you want.

Here I provide a manual on how I got my stuff working.

Installation of Ubuntu

  • Boot from the Ubuntu 9.10 Server install CD and start the setup
  • In order to use fakeraid arrays, we need the dmraid package; Ubuntu 9.10 already has it included.
  • Partition as usual (e.g. root filesystem with ext4, empty partition (for later Windows 7 installation), swap at end of harddrive)
  • GRUB installation will skip because it can’t write to the MBR, therefore pick “Continue without bootloader” from the installer menue

At this point, the system is not ready to boot. We will handle this later.
First, we continue with Windows 7.

Installation of Windows 7

  • Make your way through the installation and select your Windows 7 partition as installation target.
  • In case the created partition for Windows 7 should not be accepted as valid installation target, you can press Shift-F10 and use the “diskpart” utility to delete and recreate the Windows 7 partition (diskpart, list disk, select disk x, list partition, delete partition x, create partition)

After installing Windows 7, the system is usable (at least 50% of it), allowing you to boot into Windows 7. To be able to select between Ubuntu and Windows, we need to install GRUB, which we skipped in Step 1 and configure it accordingly.

Setting up GRUB

  • Boot from the Ubuntu 9.10 Server CD and enter the “Rescue a broken system” mode. As soon as you get to the Rescue mode switch to another console (e.g. Alt-F2)

mount /dev/mapper/pdc_bfihaijgha1 /mnt (replace with the name of your mapped Ubuntu root partition)
mount --bind /dev /mnt/dev/
mount -t proc proc /mnt/proc/
mount -t sysfs sys /mnt/sys/
chroot /mnt /bin/bash

In my case, I had to enable the CD-ROM as apt package source because I didn’t have a network connection on that computer:


nano /etc/apt/sources.list

and uncomment the line beginning with


"#deb cdrom:[Ubuntu-Server 9.10...."

Now you can install GRUB from the CD-ROM and set it up


apt-get install grub
cp /usr/lib/grub/i386-pc/* /boot/grub/

grub
grub> device (hd0) /dev/mapper/pdc_bfihaijgha (replace with the name of your mapped RAID volume)
grub> find /boot/grub/stage1
grub> root (hd0,0)
grub> setup (hd0)
grub> quit

update-grub (the menu.lst gets created for you)

Add the Windows 7 entry to menu.lst:


nano /boot/grub/menu.lst

and add the following lines to the bottom of the file


title Windows 7
rootnoverify (hd0,1)
makeactive
chainloader +1

here you can also adjust the bootmenue to show up without first pressing “Esc” (comment hidemenue) and change timers. After you have changed everything to your needs, you can restart the system and check if the bootmenue displays everything correctly and if all entries are working.

Setting file permissions using XCACLS

If you work with large quantities of files and have probably come across a situation where you had to modify file permissions, you know that the Explorer GUI is not much of a help. To relieve yourself from clicking your fingers to death, you could use XCACLS, which allows you to script file permission settings. XCACLS is also capable of creating listings of applying permissions.

As a first example on how to use XCACLS, I show you how to get a listing of all permissions applying to the folder c:\temp and its subs.

Grab yourself a copy of the XCACLS package from the MS site and go to Start > Run > cmd and cd to the path where you put xcacls.vbs and run the command below:

cscript xcacls.vbs "c:\temp\*"

The output you get, will look similar to this:


Microsoft (R) Windows Script Host Version 5.7
Copyright (C) Microsoft Corporation. All rights reserved.

Starting XCACLS.VBS (Version: 5.2) Script at x/x/2009 x:xx:xx PM

Startup directory:
"C:\"

Arguments Used:
	Filename = "c:\temp\*"
**************************************************************************
File: C:\temp\access.log

Permissions:
Type     Username                Permissions           Inheritance 

Allowed  BUILTIN\Administrators  Full Control          This Folder Only
Allowed  NT AUTHORITY\SYSTEM     Full Control          This Folder Only
Allowed  DOMAIN\user            Full Control          This Folder Only
Allowed  BUILTIN\Users           Read and Execute      This Folder Only      

No Auditing set

Owner: DOMAIN\user
**************************************************************************

Operation Complete
Elapsed Time: 0.1875 seconds.

Ending Script at x/x/2009 x:xx:xx PM

So far for the displaying of permissions.

As an example for turning on file permission inheritance in a directory tree, simply run:

cscript xcacls.vbs "c:\temp2\*" /I ENABLE /F /T /S

To conclude this post, this is how you specify the owner over a whole dir tree and all subcontents (please take care to invoke the /E parameter to tell XCACLS to only edit the ACL record, otherwise the ACL gets blanked out):

cscript xcacls.vbs "c:\temp2\*" /O username /F /T /S /E

How to use Xcacls.vbs to modify NTFS permissions
http://support.microsoft.com/?scid=kb%3Ben-us%3B825751&x=6&y=13

Adding scheduled tasks to Windows clients with GPO

In this example, I show how to add a scheduled job (taken from the article Shutting down an idle Windows computer) to multiple domain clients, using GPOs.

First, create a batch file (for example in %SystemRoot%\SYSVOL\domainname\scripts) with the following content:


schtasks /Create /RU System /TN "Shut down idle system" /SC ONIDLE /TR "C:\Windows\system32\shutdown.exe /s /f /t 0" /I 20

Open up the Group Policy Management console and add a new GPO. Go to Computer Configuration > Windows Settings > Scripts > Startup and add the newly created batch file. Now you just have to link the GPO to an OU which should be affected.

Windows XP Professional Product Documentation – Schtasks:
http://www.microsoft.com/resources/documentation/windows/xp/all/proddocs/en-us/schtasks.mspx?mfr=true

Shutting down an idle Windows computer

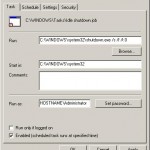
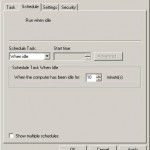
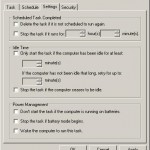
Shutting down an idle Windows XP computer, for example to save energy costs, can be done through the windows Task Scheduler. Just configure a new task according to the screen shots below (adjusting the parameters for shutdown.exe to your wishes – see the MS support link)

How To Use the Remote Shutdown Tool to Shut Down and Restart a Computer in Windows 2000: http://support.microsoft.com/kb/317371

Upgrading a IBM DS4300 system – A different approach

In this article I write about an alternative way to upgrade a IBM DS4300 SAN system from 73GB fibrechannel to 300GB fibrechannel disks (if you finally were able to get hold of them).

A main objective, besides the added storage capacity, was avoiding downtime of the storage system during the upgrade.
The procedure may sound a bit uncommon and it strongly relies on your confidence to the system and RAID in general, but it worked really smooth.

The upgrade can be done by replacing harddrive by harddrive, each time letting the spare drive jump in and after detecting the new harddrive synchronizing it back. Like many simulated drive failures… I suggest you, to replace only one harddrive per day (takes 14 days in the end).
This procedure avoids downtimes or SAN to SAN copy and only affects the systems performance marginally.
After replacing all harddrives, the system recognizes the added capacity and adds it to the array.

Backing up a remote fileserver with rsync over a ssh tunnel

Our scenario

We want to backup data from our remote host to our backup location.
For this, we use a combination of ssh and rsync.

This guide is held very general. Originally, I set up a secure rsync backup from a Synology NAS at a remote site to a linux server hosted in a DMZ, but it should also work for normal linux to linux box backups.

[] -----rsync over ssh------> []
remote-host                   backup-location

Setting up users and programs

  1. Make sure, you have installed rsync and ssh on both machines
  2. Create a new user on the backup-location (i.e. backupuser) and place his homedrive in /home

Creating SSH trust relationships between the two servers

To be able to schedule a backup job, and avoiding to save the ssh login password somewhere in plain text, we have to build our own small PKI

  1. Create a RSA keypair on the remote-host
    cd /home/USERNAME OR cd /root (if you work as root)
    mkdir .ssh
    cd .ssh

    ssh-keygen -t dsa -b 2048 (you can leave the passphrase empty)
  2. Export the remote-hosts public key to the backup-location
    cd /home/USERNAME OR cd /root (if you work as root)
    mkdir .ssh
    cd .ssh

    If you have previously copied the public key to a usb stick:
    cp /mnt/usb/remote_host.pub /home/USERNAME/.ssh OR /root/.ssh
  3. Tell the backup-locations ssh server that certificate login requests coming from the remote-host are ok
    cd /home/USERNAME/.ssh OR cd /root/.ssh (if you work as root)
    cat remote_host.pub >> authorized_keys
  4. Test the ssh connection from the remote-host to the backup-location
    ssh “backup-location”
  5. Make sure, all keys have restrictive permissions applied to them: Only allow the owner to interact with them (chmod 700)!

Setting up the rsync server infrastructure (on backup-location)

# GLOBAL OPTIONS
log file=/var/log/rsyncd
pid file=/var/run/rsyncd.pid

# MODULE OPTIONS
[backup]
	comment = public archive
	path = /home/backupuser/data
	use chroot = no
	lock file = /var/lock/rsyncd
	read only = no
	list = yes
	uid = backupuser
	ignore errors = no
	ignore nonreadable = yes
	transfer logging = yes
	log format = %t: host %h (%a) %o %f (%l bytes). Total %b bytes.
	timeout = 600
	refuse options = checksum dry-run
	dont compress = *.gz *.tgz *.zip *.z *.rpm *.deb *.iso *.bz2 *.tbz

Hint:
Make sure, the backupuser has the rights to write to the rsyncd- logifile (/var/log/rsyncd)

Testing our rsync tunnel (on remote-host)

rsync -avz -e “ssh -i /root/.ssh/remote_host.priv” /vol/folder backupuser@backup-location::backup OR
rsync -avz -e “ssh -i /home/USERNAME/.ssh/remote_host.priv” /vol/folder backupuser@backup-location::backup

Scheduling the backup job (on remote-host)

Take the command above (from the testing part), paste it into a textfile (put it where you want) and call it rsync_backup.sh (dont forget to chmod +x it afterwards):


#!/bin/sh
rsync -avz -e "ssh -i /home/USERNAME/.ssh/remote_host.priv" /vol/folder backupuser@backup-location::backup

Then, open up your crontab (usually somwhere in /etc) and add the following lines:


#minute hour    mday    month   wday    who     command
0       3       *       *       *       root    
  /PATH-TO-YOUR-SH-FILE/rsync_backup.sh 2>&1 >> /var/log/rsync_backup.log

This will start your backup job every day at 3am.