Windows Eventlogs to Syslog

Because central logging is so awesome and widely used in the Linux/Unix world, I want to show you a way how you can also gather Windows Event Logs through the good old Syslog Server.

  • On the server side, its quite simple: Use the plain vanilla Syslog or use something with Syslog capabilities (e.g. Rsyslog or even better Splunk).
  • On your Windows System, get eventlog-to-syslog (http://code.google.com/p/eventlog-to-syslog), put the two program files in C:\Windows\System32 and install it as a service as described below:
    
    C:\Users\administrator>evtsys -i -h <SYSLOGHOST>
    Checking ignore file...
    Aug 23 20:27:25 HOSTNAME Error opening file: evtsys.cfg: The system cannot find
    the file specified.
    
    Aug 23 20:27:25 HOSTNAME Creating file with filename: evtsys.cfg
    Command completed successfully
    
    C:\Users\administrator>net start evtsys
    The Eventlog to Syslog service is starting.
    The Eventlog to Syslog service was started successfully.
    

Here are the options for eventlog-to-syslog:


Version: 4.4 (32-bit)
Usage: evtsys -i|-u|-d [-h host] [-b host] [-f facility] [-p port]
       [-t tag] [-s minutes] [-l level] [-n]
  -i           Install service
  -u           Uninstall service
  -d           Debug: run as console program
  -h host      Name of log host
  -b host      Name of secondary log host
  -f facility  Facility level of syslog message
  -l level     Minimum level to send to syslog.
               0=All/Verbose, 1=Critical, 2=Error, 3=Warning, 4=Info
  -n           Include only those events specified in the config file.
  -p port      Port number of syslogd
  -q bool      Query the Dhcp server to obtain the syslog/port to log to
               (0/1 = disable/enable)
  -t tag       Include tag as program field in syslog message.
  -s minutes   Optional interval between status messages. 0 = Disabled

Default port: 514
Default facility: daemon
Default status interval: 0
Host (-h) required if installing.

List based permanent bans with fail2ban

Today I post something about the nice little tool fail2ban. As you probably know, fail2ban can be used to block those annoying brute force attacks against your servers. Other than the also popular and useful tool DenyHosts it allows the protection of other services than SSH as well (e.g. HTML login pages served by Apache). The working mechanism also differs from that of DenyHosts, as fail2ban uses iptables instead of the BSD style hosts.deny file to block annoying brute forcers. Installation is quite simple, on Debian for example, just install it through apt and you’re good to go even with the default config.

One thing that I was missing, was the option to ban IPs forever. You can basically do this by setting bantime to a negative value, but as soon as you reload your iptables rules (e.g. by restarting the fail2ban service or the whole system) the entries for the permanently banned IPs are gone.
To overcome this issue, I did some minor changes to the actions fail2ban executes on start-up and on banning.

IMPORTANT: I strongly advise you, to be careful while playing around with automated banning tools, especially if you can’t reach your server physically. Make sure, that you have something useful set in the ignoreip option under the [DEFAULT] jail (your current IP address) to not accidentally lock you out of the system (really nasty with permanent banning active…)

  1. First, check the banaction currently used (you need that, to modify the correct actionfile afterwards)
    /etc/fail2ban/jail.local

    
    #
    # ACTIONS
    #
    ...
    banaction = iptables-multiport
    ...
    
  2. Open up the corresponding actionfile and modify according to the sample below (changes are under the # Persistent banning of IPs comment)
    /etc/fail2ban/action.d/iptables-multiport.conf

    
    ...
    actionstart = iptables -N fail2ban-<name>
                  iptables -A fail2ban-<name> -j RETURN
                  iptables -I INPUT -p <protocol> -m multiport --dports <port> -j fail2ban-<name>
                  # Persistent banning of IPs
                  cat /etc/fail2ban/ip.blacklist | while read IP; do iptables -I fail2ban-<name> 1 -s $IP -j DROP; done
    ...
    actionban = iptables -I fail2ban-<name> 1 -s <ip> -j DROP
                # Persistent banning of IPs
                echo '<ip>' >> /etc/fail2ban/ip.blacklist
    ...
    
  3. Your blacklist should look something like this (one IP per line, of course you can add IPs manually)
    /etc/fail2ban/ip.blacklist

    
    ...
    10.0.0.242
    192.168.1.39
    ...
    
  4. Restart fail2ban to make the changes active

Now, what happens is that each time fail2ban starts, it loops through your ip.blacklist and blocks the IPs in there. If fail2ban blocks a new IP, it will automatically append it to the blacklist.

Links
http://www.fail2ban.org
http://www.fail2ban.org/wiki/index.php/Whitelist
http://denyhosts.sourceforge.net

Update
The following config adds some nice features that were missing in the example above:

  • No duplicate iptables rules (@Lin: might be interesting for you)
  • Jail specific blocking rules (similar to Dr. Tyrell’s and samuelE’s suggestions in the comments)
  • Reporting offender IPs to badips.com

/etc/fail2ban/action.d/iptables-multiport.conf:


# Fail2Ban configuration file
#
# Author: Cyril Jaquier
# Modified by Yaroslav Halchenko for multiport banning and Lukas Camenzind for persistent banning 
#
#
[Definition]
# Option:  actionstart
# Notes.:  command executed once at the start of Fail2Ban.
# Values:  CMD
#
actionstart = iptables -N fail2ban-<name>
              iptables -A fail2ban-<name> -j RETURN
              iptables -I INPUT -p <protocol> -m multiport --dports <port> -j fail2ban-<name>
              # Load local list of offenders
              if [ -f /etc/fail2ban/ip.blacklist ]; then cat /etc/fail2ban/ip.blacklist | grep -e <name>$ | cut -d "," -s -f 1 | while read IP; do iptables -I fail2ban-<name> 1 -s $IP -j DROP; done; fi
# Option:  actionstop
# Notes.:  command executed once at the end of Fail2Ban
# Values:  CMD
#
actionstop = iptables -D INPUT -p <protocol> -m multiport --dports <port> -j fail2ban-<name>
             iptables -F fail2ban-<name>
             iptables -X fail2ban-<name>
# Option:  actioncheck
# Notes.:  command executed once before each actionban command
# Values:  CMD
#
actioncheck = iptables -n -L INPUT | grep -q fail2ban-<name>
# Option:  actionban
# Notes.:  command executed when banning an IP. Take care that the
#          command is executed with Fail2Ban user rights.
# Tags:    <ip>  IP address
#          <failures>  number of failures
#          <time>  unix timestamp of the ban time
# Values:  CMD
#
actionban = if ! iptables -C fail2ban-<name> -s <ip> -j DROP; then iptables -I fail2ban-<name> 1 -s <ip> -j DROP; fi
            # Add offenders to local blacklist, if not already there
            if ! grep -Fxq '<ip>,<name>' /etc/fail2ban/ip.blacklist; then echo '<ip>,<name>' >> /etc/fail2ban/ip.blacklist; fi
            # Report offenders to badips.com
            wget -q -O /dev/null www.badips.com/add/<name>/<ip>
# Option:  actionunban
# Notes.:  command executed when unbanning an IP. Take care that the
#          command is executed with Fail2Ban user rights.
# Tags:    <ip>  IP address
#          <failures>  number of failures
#          <time>  unix timestamp of the ban time
# Values:  CMD
#
actionunban = iptables -D fail2ban-<name> -s <ip> -j DROP
              # Disabled clearing out entry from ip.blacklist (somehow happens after each stop of fail2ban)
              # sed --in-place '/<ip>,<name>/d' /etc/fail2ban/ip.blacklist
[Init]
# Defaut name of the chain
#
name = default
# Option:  port
# Notes.:  specifies port to monitor
# Values:  [ NUM | STRING ]  Default:
#
port = ssh
# Option:  protocol
# Notes.:  internally used by config reader for interpolations.
# Values:  [ tcp | udp | icmp | all ] Default: tcp
# 

Backing up a MySQL server

Just wanted to paste a small script here, which dumps and gzips all databases hosted on a MySQL instance.
Make sure, that this script is not readable for everybody, as it contains credentials.

dumpdbs.sh


#!/bin/bash
#
# MySQL database dump
#
# - Takes MySQL Dumps of all available databases
# - Only keeps one backup in the dumpfolder
# -> uncomment the LOG variable and the pipes to the tee command for logging to a file
#
# 2011, Looke
#

# Setup
DBUSER=root
DBPASS=xxx
DBDUMPDIR=/dbdumps
DBDUMPDATE=$(date '+%d-%m-%Y')
# LOG=/var/log/dumpdbs

# Create/Empty DBDUMPDIR
if [ ! -d $DBDUMPDIR ]; then
	echo $(date +"%d/%m/%Y %T") INFO: $DBDUMPDIR not found, will create it... #| tee -a $LOG
	mkdir $DBDUMPDIR
else
	echo $(date +"%d/%m/%Y %T") INFO: Emptying $DBDUMPDIR... #| tee -a $LOG
	rm -f $DBDUMPDIR/*
fi

# Loop through all databases available and dump them (gzipped)
for DBNAME in $(echo "show databases;" | mysql --user=$DBUSER --password=$DBPASS -s)
do
	echo $(date +"%d/%m/%Y %T") INFO: Dumping $DBNAME as ${DBNAME}_${DBDUMPDATE}.sql.gz... # | tee -a $LOG
	mysqldump --user=$DBUSER --password=$DBPASS $DBNAME | gzip -c > $DBDUMPDIR/${DBNAME}_${DBDUMPDATE}.sql.gz
done

This script does a good job together with Bacula. Here the Job resource in Bacula


Job {
  Name = "Backup MySQL DBs"
  ...
  Client Run Before Job = "/opt/bacula/scripts/dumpdbs.sh"  
  ...
}

Deploying the pfSense firewall system on ALIX hardware

Recently, while fiddling around with my home network I got really tired of my old Netgear Wifi router and its limited functionality. After I found out that the revision I have doesn’t allow to run any custom firmware (dd-wrt or tomato), I decided to look out for something more open (and fun). I already used IPCop and so I started from there, thinking about building up a small computer to run IPCop. But having to dedicate a computer only for use as a home router/firewall sucks a bit… So after some further web research i bumped into the ALIX boards. Basically, they’re fully featured PCs on a single board allowing to hook up a CF card and to run a OS from there. Many people are successfully running the open source FreeBSD based firewall distro pfSense (an offspring of the m0n0wall firewall distro, which btw. also runs on ALIX systems) on it, so I decided to give it a shot. I placed an order for the required hardware on www.pcengines.ch (see “My system”) and after two days everything arrived. Building the system was good fun and after 15 minutes, everything was up and running.

My system

  • 1x ALIX.2D2 system board
  • 1x Enclosure 2 LAN, black, USB
  • 1x AC adapter 18V
  • 2x Cable I-PEX -> reverse SMA
  • 2x Antenna reverse SMA
  • 1x Compex WLM54SAG23 miniPCI card
  • 1x SanDisk ULTRA Compact Flash 4 GB

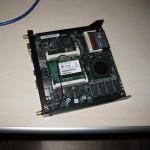
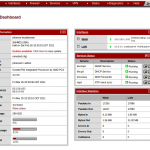
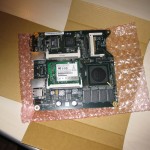
Here you can see some building steps and a screenshot of the pfSense dashboard.

Before you install anything, make sure your board has a up-to date BIOS installed. To do so, connect the ALIX to your computer using a nullmodem cable (with Serial to USB if needed). I used minocom on my ubuntu machine, using the settings 38400 8N1, without flow control. The most current BIOS as I’m writing this article is 0.99h. If you have an older version installed, you should upgrade it (check the ALIX manual).

PC Engines ALIX.2 v0.99h                                                     
640 KB Base Memory                                                           
261120 KB Extended Memory 

Installing pfSense is quite simple. Fetch the suitable image (which fits your CF card size) and flash it

Flashing the image to the CF card
I would recommend you to use a USB CF cardreader. Make sure, the CF is not mounted and get the correct device name of it. Flash the image with the following command:


zcat pfSense-2.0-RC1-4g-i386-20110226-1633-nanobsd.img.gz | dd of=/dev/sdX bs=16k

pfSense allows to read out several parameters via SNMP

Reading the system uptime via SNMP


snmpget -c public -v 2c -O qv 10.0.0.1 HOST-RESOURCES-MIB::hrSystemUptime.0

Links
http://www.pcengines.ch
http://pfsense.org
http://m0n0.ch/wall/

ActiveDirectory – Connectivity through NAT

Even though, ActiveDirectory communication through a NATed (and port-forwarded) interface is not officially supported by MS, there is a way to do that. I stumbled upon this issue, after forgetting it for quite some time (solved it with a nasty hack in the first place – keyword: read only DNS entries)

Situation:


 [DC1]------------>[NATed interface]------------>[DC2]<--------[Clients]

  • DC1 addresses DC2 by the address of the NAT interface
  • CLIENTS address DC2 by its real address

Problem
DC2 updates its DNS record with its current IP address (real address)
DC1 can't reach DC2 through its real IP, instead it would need the address of the NAT interface.

Solution
Add the following Registry Key on DC2 to force it to add its real and his NATed IP to its Host DNS records

HKLM\SYSTEM\CurrentControlSet\Services\DNS\Parameters
Registry Value: PublishAddresses
Registry Value Type: REG_SZ
Registry Value Data: sepparated by single whitespace

The nice thing is, that the DNS server serves the address of DC2 that is suitable for the host. If the host is on the same network as DC2 it gets its real IP, if its on the other side of the NATed interface it gets the NAT interfaces address.

More infos
DNS PublishAddresses Parameter: http://technet.microsoft.com/en-us/library/cc959753.aspx
Nice Technet Article about Replication through Firewalls: http://technet.microsoft.com/en-us/library/bb727063.aspx

Sorting out denied SMB access

Assumption
The fileserver is joined to a ActiveDirectory domain through Winbind

Issue
SMB/Filesystem permissions seem to not apply, if a folder is owned by a local group and the domain users are members of that group.
Observable effects are “Access denied” messages while trying to access the SMB share from a windows machine with a domain user, even though through SSH the domain user can access the respective folder.
A common scenario is, if the file server was recently integrated into a domain and there are still local, non-domain users working on it.

Some information to start with:


[root@fileserver ~]# id user
uid=900(user) gid=1000(localgroup) groups=1000(localgroup)

[root@fileserver ~]# id DOMAIN+user
uid=20000(DOMAIN+user) gid=20000(DOMAIN+domain users) groups=20000(DOMAIN+domain users),1000(localgroup),20001(DOMAIN+domaingroup),10008(BUILTIN+users)

[root@fileserver ~]# ls -la /data
drwxrwxrwx 10 root    root                 4096 Feb 30 13:37 .
drwxr-xr-x 28 root    root                 4096 Feb 30 13:37 ..
...
drwxrwx---  6 root    localgroup           4096 Feb 30 13:37 share
...

[root@fileserver ~]# getent group localgroup
localgroup:x:1000:DOMAIN+user

Solution
Mapping local users to domain users. Check option “username map”

/etc/samba/smb.conf:


[global]
	workgroup = DOMAIN
	realm = DOMAIN.COM
	password server = DC.DOMAIN.COM
	winbind separator = +	
	security = ads
	...	
	username map = /etc/samba/smbusers
	...	
	
[share]
	comment = My share
	browseable = yes
	writeable = yes
	readonly = no
	path = /data/share
	guest ok = no
	create mask = 0770
	directory mask = 0770
	inherit acls = yes
	inherit permissions = yes

/etc/samba/smbusers:


# Unix_name = SMB_name1 SMB_name2 ...
root = administrator admin
nobody = guest pcguest smbguest
user = DOMAIN+user

smb.conf manpage
http://www.samba.org/samba/docs/man/manpages-3/smb.conf.5.html

Monitoring ESX servers with Zabbix

Install the Zabbix monitoring agent binaries
Installing the Zabbix agent is quite simple, you could try the RedHat RPMs… I tried with the generic Linux 2.6.x binaries and it worked.
The only thing you have to consider, that the ESX console doesn’t come with wget, so you probably will have to SCP the rpm package to your ESX server.

Create a Firewall rule for the in- and outbound monitoring ports used by Zabbix
There are two ways of doing that:

  1. Issuing the following commands on the ESX command console – nice, but annoying for more that two ESXes:
    esxcfg-firewall -openPort 10050,tcp,in,zabbixClient
    esxcfg-firewall -openPort 10051,tcp,out,zabbixServer
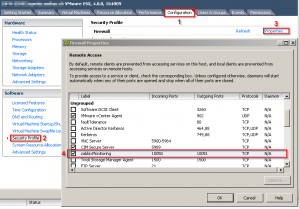
  2. Or creating a XML file which holds the definition of the rule, which later allows more convenient handling (activating or deactivating) of the rule through the vSphere Client GUI – neat for larger farms of ESX servers.

Here is what you need to do to implement the second option (works for ESX 4):

  • Connect to the ESX console and create a new XML file in /etc/vmware/firewall called zabbixMonitoring.xml
  • Contents of /etc/vmware/firewall/zabbixMonitoring.xml:
  • 
    <!-- Firewall configuration information for Zabbix Monitoring system -->
    <ConfigRoot>
     <service>
     <id>zabbixMonitoring</id>
     <rule id='0000'>
     <direction>inbound</direction>
     <protocol>tcp</protocol>
     <port type='dst'>10050</port>
     <flags>-m state --state NEW</flags>
     </rule>
     <rule id='0001'>
     <direction>outbound</direction>
     <protocol>tcp</protocol>
     <port type='dst'>10051</port>
     <flags>-m state --state NEW</flags>
     </rule>
     </service>
    </ConfigRoot>
    
  • Restart the VMware management service: service mgmt-vmware restart
  • Connect to the ESX server and enable the Zabbix Monitoring rule in the vSphere Client GUI

Application backup – Scripted pre- and postbackup actions

Many of today’s businesses rely heavily on their application servers. The times of simple fileshares and single-document based processes are over and with them the time of simple filecopy as a method of backing up is over.

In this article I want to describe a method to backup the two most common components of a modern application service: filesystem and database.
No matter how you solve your backup, the approach should always make sure, that the database integrity is given and that the filesystem is in sync with the database state.

The following two scripts are deployed as a Pre- and a Post backup script. The Pre- Backup script stops the application, dumps the database contents, creates a LVM snapshot and re-starts the application. Post- Backup removes the snapshot.

The fileset for the backup application would then look like this:
Database dumps: /dbdump
Filesystem snapshot: /volume-snapshot

appbackup-run-before.sh


#!/bin/bash
#
# Application Service Backup - Part 1 of 2
#
# Pre-Backup script
# - Stops Service
# - Takes a MySQL Dump
# - Creates a LVM Snapshot
# - Restarts Service
# - Mounts the LVM Snapshot
#
# 2010, Looke
#

# Which service to mess with
SERVICE="service"

# LVM Stuff
LVMVOLUME="/dev/lvm/volume"
LVMSNAPSHOT="volume-snapshot"
LVMSNAPSHOTSIZE="50G"

# MySQL Properties
DBDUMPDIR="/dbdump"
DBNAME="aaa"
DBHOST="zzz"
DBUSER="xxx"
DBPASSWORD="yyy"

echo "Shutting down Service..."
/etc/init.d/${SERVICE} stop

while ps ax | grep -v grep | grep ${SERVICE} > /dev/null;
do
  echo "...stopping..."
  sleep 5
done

echo "Creating MySQL Dump..."
if [ ! -d "${DBDUMPDIR}" ]; then
  mkdir -p ${DBDUMPDIR}
fi
mysqldump --host=${DBHOST} --user=${DBUSER} --password=${DBPASSWORD} ${DBNAME} > ${DBDUMPDIR}/${DBNAME}.sql

echo "Creating LVM Snapshot..."
modprobe dm-snapshot
lvm lvcreate --size ${LVMSNAPSHOTSIZE} --snapshot --name ${LVMSNAPSHOT} ${LVMVOLUME}
sleep 5

echo "Restarting Service..."
/etc/init.d/${SERVICE} start

while ! ps ax | grep -v grep | grep ${SERVICE} > /dev/null;
do
  echo "...starting..."
  sleep 5
done

echo "Mounting LVM Snapshot..."
if [ ! -d "/${LVMSNAPSHOT}" ]; then
  mkdir -p /${LVMSNAPSHOT}
fi
mount -o ro /dev/lvm/${LVMSNAPSHOT} /${LVMSNAPSHOT}

exit 0

appbackup-run-after.sh


#!/bin/bash
#
# Application Service Backup - Part 2 of 2
#
# Post-Backup script
# - Unmounts the LVM Snapshot
# - Destroys the LVM Snapshot
#
# 2010, Looke
#

# LVM Stuff
LVMSNAPSHOT="volume-snapshot"

echo "Unmounting LVM Snapshot..."
umount /${LVMSNAPSHOT}

echo "Destroying LVM Snapshot..."
lvm lvremove -f /dev/lvm/${LVMSNAPSHOT}

exit 0

One backdraw of this method is, that the service has to be stopped in order to get a consistent state of the data. If the service has to be online 24/7 you would have to consider clustering (anyways, you would have to come up with something to cover unplanned downtimes).

Here is a small excerpt to show you how to configure the Pre- and Post backup scripts with the open source backup software Bacula. I assume if you use some other backup software, you can click your way through the GUI yourself :)


Job {
  Name = "Appbackup"
  ...
  Client Run Before Job = "/opt/bacula/scripts/appbackup-run-before.sh"
  Client Run After Job = "/opt/bacula/scripts/appbackup-run-after.sh"
  ...
}

Useful links:
Bacula Documentation – Job Ressource
Ubuntuusers Wiki – LVM (german)

Moving a XEN guest to a new Dom0

I assume, you use LVM volumes for your XEN guests. I’m not going to use “xm migrate” here, the method used works by dd’ing the LVM volume over to the new Dom0, so make sure, you have a fitting LVM volume in place on your destination system.
I recommend you to stop the machine you’re going to move (or you could consider to create a LVM snapshot). Anyways, if you know nothing will change you can try it with the running machine (I did this once, and it resulted in a fsck upon boot but without any further problems).

With this one you can dd the LVM volume to the new host:


dd if=/dev/x bs=1M | ssh username@remote-server "dd of=/dev/y bs=1M"

To check the status of the copyjob, open a new console and issue (note: the USR1 signal lets dd print some infos):


watch -n 5 "killall -USR1 dd"

To finish the move, copy the XEN host config file to the new system:


scp /etc/xen/hostconfig username@remote-server:/etc/xen/hostconfig

Links
http://en.wikipedia.org/wiki/Dd_(Unix)

The painless way to handle VMware ESX snapshots

If you work with virtual machines, you most likely already played around with snapshots. Its a really handy feature which lets you roll-back to a earlier stage of the lifetime of a system, just in case something goes wrong. During the extended lifetime of some VMs there might accumulate quite numerous snapshots which bloat the folder of the VM noticeably. One might think, that he just deletes the old snaps through ssh console access and the sky is blue again…?

If you just delete the old stuff by ssh console, you might run into some serious pains. The way here is merging the snapshots back to the vmdk. The way through the vSphere Client is the following: “Right-click on VM -> Snapshot -> Snapshot Manager -> Delete all”. Here is also where the trouble can start, in case you run out of storage. The way the snapshots get merged is the following:

Assume we have three snapshots:
Snap m, Size x
Snap n, Size y
Snap p, Size z

Step 1 of the merge:

  • Snap n transforms to Snap mn, Size x+y
  • Snap m deleted

Step2 of the merge:

  • Snap p transforms to Snap mnp, Size x+y+z
  • Snap mn deleted

Step3 of the merge:

  • Snap mnp gets merged with originating vmdk
  • Snap mnp deleted

So if you’re really tight in disk space, you might try to delete snapshot by snapshot instead of the “Delete all” option, starting with the newest.

If you have messed up totally and can’t delete the snapshots, a last effort could be to attach a Harddrive to your physical system (e.g. USB, eSATA you name it…) and use the VMware Converter to clone away the messed up VM in a clean vmdk.

The conclusion here is to carefully use snapshots and merging them proactively, avoiding to have too much system states flying around.

Useful links
Here you can find some backgrounds on snapshots: http://kb.vmware.com/selfservice/microsites/search.do?language=en_US&cmd=displayKC&externalId=1015180
KB article about running out of disk space during snapshot merge: http://kb.vmware.com/selfservice/microsites/search.do?language=en_US&cmd=displayKC&externalId=1003302