Backing up a MySQL server

Just wanted to paste a small script here, which dumps and gzips all databases hosted on a MySQL instance.
Make sure, that this script is not readable for everybody, as it contains credentials.

dumpdbs.sh


#!/bin/bash
#
# MySQL database dump
#
# - Takes MySQL Dumps of all available databases
# - Only keeps one backup in the dumpfolder
# -> uncomment the LOG variable and the pipes to the tee command for logging to a file
#
# 2011, Looke
#

# Setup
DBUSER=root
DBPASS=xxx
DBDUMPDIR=/dbdumps
DBDUMPDATE=$(date '+%d-%m-%Y')
# LOG=/var/log/dumpdbs

# Create/Empty DBDUMPDIR
if [ ! -d $DBDUMPDIR ]; then
	echo $(date +"%d/%m/%Y %T") INFO: $DBDUMPDIR not found, will create it... #| tee -a $LOG
	mkdir $DBDUMPDIR
else
	echo $(date +"%d/%m/%Y %T") INFO: Emptying $DBDUMPDIR... #| tee -a $LOG
	rm -f $DBDUMPDIR/*
fi

# Loop through all databases available and dump them (gzipped)
for DBNAME in $(echo "show databases;" | mysql --user=$DBUSER --password=$DBPASS -s)
do
	echo $(date +"%d/%m/%Y %T") INFO: Dumping $DBNAME as ${DBNAME}_${DBDUMPDATE}.sql.gz... # | tee -a $LOG
	mysqldump --user=$DBUSER --password=$DBPASS $DBNAME | gzip -c > $DBDUMPDIR/${DBNAME}_${DBDUMPDATE}.sql.gz
done

This script does a good job together with Bacula. Here the Job resource in Bacula


Job {
  Name = "Backup MySQL DBs"
  ...
  Client Run Before Job = "/opt/bacula/scripts/dumpdbs.sh"  
  ...
}

Sorting out denied SMB access

Assumption
The fileserver is joined to a ActiveDirectory domain through Winbind

Issue
SMB/Filesystem permissions seem to not apply, if a folder is owned by a local group and the domain users are members of that group.
Observable effects are “Access denied” messages while trying to access the SMB share from a windows machine with a domain user, even though through SSH the domain user can access the respective folder.
A common scenario is, if the file server was recently integrated into a domain and there are still local, non-domain users working on it.

Some information to start with:


[root@fileserver ~]# id user
uid=900(user) gid=1000(localgroup) groups=1000(localgroup)

[root@fileserver ~]# id DOMAIN+user
uid=20000(DOMAIN+user) gid=20000(DOMAIN+domain users) groups=20000(DOMAIN+domain users),1000(localgroup),20001(DOMAIN+domaingroup),10008(BUILTIN+users)

[root@fileserver ~]# ls -la /data
drwxrwxrwx 10 root    root                 4096 Feb 30 13:37 .
drwxr-xr-x 28 root    root                 4096 Feb 30 13:37 ..
...
drwxrwx---  6 root    localgroup           4096 Feb 30 13:37 share
...

[root@fileserver ~]# getent group localgroup
localgroup:x:1000:DOMAIN+user

Solution
Mapping local users to domain users. Check option “username map”

/etc/samba/smb.conf:


[global]
	workgroup = DOMAIN
	realm = DOMAIN.COM
	password server = DC.DOMAIN.COM
	winbind separator = +	
	security = ads
	...	
	username map = /etc/samba/smbusers
	...	
	
[share]
	comment = My share
	browseable = yes
	writeable = yes
	readonly = no
	path = /data/share
	guest ok = no
	create mask = 0770
	directory mask = 0770
	inherit acls = yes
	inherit permissions = yes

/etc/samba/smbusers:


# Unix_name = SMB_name1 SMB_name2 ...
root = administrator admin
nobody = guest pcguest smbguest
user = DOMAIN+user

smb.conf manpage
http://www.samba.org/samba/docs/man/manpages-3/smb.conf.5.html

Monitoring ESX servers with Zabbix

Install the Zabbix monitoring agent binaries
Installing the Zabbix agent is quite simple, you could try the RedHat RPMs… I tried with the generic Linux 2.6.x binaries and it worked.
The only thing you have to consider, that the ESX console doesn’t come with wget, so you probably will have to SCP the rpm package to your ESX server.

Create a Firewall rule for the in- and outbound monitoring ports used by Zabbix
There are two ways of doing that:

  1. Issuing the following commands on the ESX command console – nice, but annoying for more that two ESXes:
    esxcfg-firewall -openPort 10050,tcp,in,zabbixClient
    esxcfg-firewall -openPort 10051,tcp,out,zabbixServer
  2. Or creating a XML file which holds the definition of the rule, which later allows more convenient handling (activating or deactivating) of the rule through the vSphere Client GUI – neat for larger farms of ESX servers.

Here is what you need to do to implement the second option (works for ESX 4):

  • Connect to the ESX console and create a new XML file in /etc/vmware/firewall called zabbixMonitoring.xml
  • Contents of /etc/vmware/firewall/zabbixMonitoring.xml:
  • 
    <!-- Firewall configuration information for Zabbix Monitoring system -->
    <ConfigRoot>
     <service>
     <id>zabbixMonitoring</id>
     <rule id='0000'>
     <direction>inbound</direction>
     <protocol>tcp</protocol>
     <port type='dst'>10050</port>
     <flags>-m state --state NEW</flags>
     </rule>
     <rule id='0001'>
     <direction>outbound</direction>
     <protocol>tcp</protocol>
     <port type='dst'>10051</port>
     <flags>-m state --state NEW</flags>
     </rule>
     </service>
    </ConfigRoot>
    
  • Restart the VMware management service: service mgmt-vmware restart
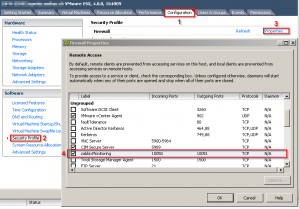
  • Connect to the ESX server and enable the Zabbix Monitoring rule in the vSphere Client GUI

Application backup – Scripted pre- and postbackup actions

Many of today’s businesses rely heavily on their application servers. The times of simple fileshares and single-document based processes are over and with them the time of simple filecopy as a method of backing up is over.

In this article I want to describe a method to backup the two most common components of a modern application service: filesystem and database.
No matter how you solve your backup, the approach should always make sure, that the database integrity is given and that the filesystem is in sync with the database state.

The following two scripts are deployed as a Pre- and a Post backup script. The Pre- Backup script stops the application, dumps the database contents, creates a LVM snapshot and re-starts the application. Post- Backup removes the snapshot.

The fileset for the backup application would then look like this:
Database dumps: /dbdump
Filesystem snapshot: /volume-snapshot

appbackup-run-before.sh


#!/bin/bash
#
# Application Service Backup - Part 1 of 2
#
# Pre-Backup script
# - Stops Service
# - Takes a MySQL Dump
# - Creates a LVM Snapshot
# - Restarts Service
# - Mounts the LVM Snapshot
#
# 2010, Looke
#

# Which service to mess with
SERVICE="service"

# LVM Stuff
LVMVOLUME="/dev/lvm/volume"
LVMSNAPSHOT="volume-snapshot"
LVMSNAPSHOTSIZE="50G"

# MySQL Properties
DBDUMPDIR="/dbdump"
DBNAME="aaa"
DBHOST="zzz"
DBUSER="xxx"
DBPASSWORD="yyy"

echo "Shutting down Service..."
/etc/init.d/${SERVICE} stop

while ps ax | grep -v grep | grep ${SERVICE} > /dev/null;
do
  echo "...stopping..."
  sleep 5
done

echo "Creating MySQL Dump..."
if [ ! -d "${DBDUMPDIR}" ]; then
  mkdir -p ${DBDUMPDIR}
fi
mysqldump --host=${DBHOST} --user=${DBUSER} --password=${DBPASSWORD} ${DBNAME} > ${DBDUMPDIR}/${DBNAME}.sql

echo "Creating LVM Snapshot..."
modprobe dm-snapshot
lvm lvcreate --size ${LVMSNAPSHOTSIZE} --snapshot --name ${LVMSNAPSHOT} ${LVMVOLUME}
sleep 5

echo "Restarting Service..."
/etc/init.d/${SERVICE} start

while ! ps ax | grep -v grep | grep ${SERVICE} > /dev/null;
do
  echo "...starting..."
  sleep 5
done

echo "Mounting LVM Snapshot..."
if [ ! -d "/${LVMSNAPSHOT}" ]; then
  mkdir -p /${LVMSNAPSHOT}
fi
mount -o ro /dev/lvm/${LVMSNAPSHOT} /${LVMSNAPSHOT}

exit 0

appbackup-run-after.sh


#!/bin/bash
#
# Application Service Backup - Part 2 of 2
#
# Post-Backup script
# - Unmounts the LVM Snapshot
# - Destroys the LVM Snapshot
#
# 2010, Looke
#

# LVM Stuff
LVMSNAPSHOT="volume-snapshot"

echo "Unmounting LVM Snapshot..."
umount /${LVMSNAPSHOT}

echo "Destroying LVM Snapshot..."
lvm lvremove -f /dev/lvm/${LVMSNAPSHOT}

exit 0

One backdraw of this method is, that the service has to be stopped in order to get a consistent state of the data. If the service has to be online 24/7 you would have to consider clustering (anyways, you would have to come up with something to cover unplanned downtimes).

Here is a small excerpt to show you how to configure the Pre- and Post backup scripts with the open source backup software Bacula. I assume if you use some other backup software, you can click your way through the GUI yourself :)


Job {
  Name = "Appbackup"
  ...
  Client Run Before Job = "/opt/bacula/scripts/appbackup-run-before.sh"
  Client Run After Job = "/opt/bacula/scripts/appbackup-run-after.sh"
  ...
}

Useful links:
Bacula Documentation – Job Ressource
Ubuntuusers Wiki – LVM (german)

Moving a XEN guest to a new Dom0

I assume, you use LVM volumes for your XEN guests. I’m not going to use “xm migrate” here, the method used works by dd’ing the LVM volume over to the new Dom0, so make sure, you have a fitting LVM volume in place on your destination system.
I recommend you to stop the machine you’re going to move (or you could consider to create a LVM snapshot). Anyways, if you know nothing will change you can try it with the running machine (I did this once, and it resulted in a fsck upon boot but without any further problems).

With this one you can dd the LVM volume to the new host:


dd if=/dev/x bs=1M | ssh username@remote-server "dd of=/dev/y bs=1M"

To check the status of the copyjob, open a new console and issue (note: the USR1 signal lets dd print some infos):


watch -n 5 "killall -USR1 dd"

To finish the move, copy the XEN host config file to the new system:


scp /etc/xen/hostconfig username@remote-server:/etc/xen/hostconfig

Links
http://en.wikipedia.org/wiki/Dd_(Unix)

The painless way to handle VMware ESX snapshots

If you work with virtual machines, you most likely already played around with snapshots. Its a really handy feature which lets you roll-back to a earlier stage of the lifetime of a system, just in case something goes wrong. During the extended lifetime of some VMs there might accumulate quite numerous snapshots which bloat the folder of the VM noticeably. One might think, that he just deletes the old snaps through ssh console access and the sky is blue again…?

If you just delete the old stuff by ssh console, you might run into some serious pains. The way here is merging the snapshots back to the vmdk. The way through the vSphere Client is the following: “Right-click on VM -> Snapshot -> Snapshot Manager -> Delete all”. Here is also where the trouble can start, in case you run out of storage. The way the snapshots get merged is the following:

Assume we have three snapshots:
Snap m, Size x
Snap n, Size y
Snap p, Size z

Step 1 of the merge:

  • Snap n transforms to Snap mn, Size x+y
  • Snap m deleted

Step2 of the merge:

  • Snap p transforms to Snap mnp, Size x+y+z
  • Snap mn deleted

Step3 of the merge:

  • Snap mnp gets merged with originating vmdk
  • Snap mnp deleted

So if you’re really tight in disk space, you might try to delete snapshot by snapshot instead of the “Delete all” option, starting with the newest.

If you have messed up totally and can’t delete the snapshots, a last effort could be to attach a Harddrive to your physical system (e.g. USB, eSATA you name it…) and use the VMware Converter to clone away the messed up VM in a clean vmdk.

The conclusion here is to carefully use snapshots and merging them proactively, avoiding to have too much system states flying around.

Useful links
Here you can find some backgrounds on snapshots: http://kb.vmware.com/selfservice/microsites/search.do?language=en_US&cmd=displayKC&externalId=1015180
KB article about running out of disk space during snapshot merge: http://kb.vmware.com/selfservice/microsites/search.do?language=en_US&cmd=displayKC&externalId=1003302

Logon scripts with KiXtart

To follow up one of my previous posts (Mapping of network drives via batchfile), here is how you also could solve this kind of task using KiXtart. KiXtart is a free-format scripting language which allows to automate extensive configuration tasks, for example, but not limited to windows logon events.

Installation of KiXtart is quite simple, just get the binary, place it somewhere useful (i.e. the NETLOGON share in Windows domain environments) and edit the user accounts to use it as logon script (or write a batch logon script which calls the Kix binary).

Below is how i solved the problem of having a large list of available shares automatically checked if the user has permission to use them and if so to connect them to his computer.

I presume, you have Windows Security Groups in place, which use the same name as the shared folders.


; =============
;
; Dynamic share mapping script
;
; Author: Looke, 2010
; Filename: kixtart.kix
;
; Outline:
; * Iterates through the ServerDrives array, determines wether the
;   user is in the appropriate security group or not and maps
;   the network drive to a driveletter specified in the DriveLetters
;   array.
;
; =============

; -------------
; Admin configurable
; -------------

; Array of available groupshares
$ServerDrives = "\\SRV01\Share1",
		"\\SRV02\Share1"

; Array of available drive letters
$DriveLetters = "V:", "W:", "X:", "Y:", "Z:"

; -------------
; Better leave untouched
; -------------

; Iterator for the DriveLetters array
$DriveLetterIndex = 0

; -------------
; Removing current mappings
; -------------

; Removing mapped groupshares
FOR EACH $DriveLetter in $DriveLetters
	USE $DriveLetter /DELETE
NEXT

; -------------
; Mapping of groupshares
; -------------

; Dynamic mapping of groupshares
FOR EACH $ServerDrive in $ServerDrives

	; Getting the name of the shared folder
	; (which also is the name of the Windows Security Group)
	$Group = SPLIT($ServerDrive, "\")

	IF INGROUP($Group[3])
		USE $DriveLetters[0+$DriveLetterIndex] $ServerDrive
		IF @ERROR
			? "Failed with errorcode " + @ERROR
			  + " while mapping "
			  + $ServerDrive + " to "
			  + $DriveLetters[0+$DriveLetterIndex]
		ELSE
			? "Successfully mapped "
			  + $ServerDrive + " to "
			  + $DriveLetters[0+$DriveLetterIndex]
			$DriveLetterIndex = $DriveLetterIndex+1
		ENDIF
	ENDIF
NEXT

In my script, I didn’t make the mappings persistent. So, if you intend to also have users with laptops and a after-login VPN solution to connect to your servers, you might need to add the /PERSISTENT switch to the USE command(s).

Something else, which might be useful, is logging of logon events, as fiddling around with the windows security logs can be a bit of a pain. Missing in the script above, but can easily be integrated:


; Path to the logon logfiles (make sure, users can write to this path)
$LogPath = "\\SRV01\LOG$"

; Filenames and Paths of logon logfiles
$LogFile = "$LogPath\@WKSTA.log"

; Content of logon logfile
$LogText = "Date: @MDAYNO.@MONTHNO.@YEAR, @TIME" + CHR(13) + CHR(10) + 
	   "User: @USERID" + CHR(13) + CHR(10) + 
	   "Workstation: @WKSTA" + CHR(13) + CHR(10) + 
	   "IPs: @IPADDRESS0, @IPADDRESS1" + CHR(13) + CHR(10) + 
	   "MAC address: @ADDRESS" + CHR(13) + CHR(10) +
	   "-----------------------------------" + CHR(13) + CHR(10)

; Open, write and close Logfile
$LogError = OPEN(5, $LogFile, 5)
IF $LogError = 0
	$RES = WRITELINE(5, $LogText)
	$RES = CLOSE(5)
ENDIF 

A manual to using KiX can be found here:
http://www.kixtart.org/manual/

Deploying the open-source backup solution Bacula

It’s now about two years ago, that I wondered “Why the … are we paying support and license subscriptions, if the only benefit is that you can listen to the support line music and get a new logo in the softwares main window after each update?”. Ok, the software works so far. But for every new client, you have to relicense and especially support for linux hosts can be a real pain.

I don’t want to call any names here nor start an argument with any fanboys. But being tired of all this commercial “corporate” softwares, I want to share my approach to installing the free and open source backup software Bacula.

Please feel free, to write me if you find possible errors or misconfigurations. I plan to extend this how-to with more detailled instructions.

Well, back to bacula: This overview visualizes the interactions of all bacula modules (taken from the bacula.org wiki)

To keep things simple, I start with a small but expandable test installation, consisting of one server and one or maybe two clients. In this case:

Hosts

  • bacula-server (Debian Lenny) – Director, Storage Daemon, File Daemon
  • mysql-server – MySQL Catalog
  • bacula-client-linux (Debian Lenny) – File Daemon
  • bacula-client-win (WinXP) – File Daemon

Following, I note all commands that are necessary to install the mentioned scenarion.

Installation of bacula-server (Director, Storage Daemon, File Daemon)


bacula-server:~# aptitude install build-essential libpq-dev libncurses5-dev libssl-dev psmisc libmysqlclient-dev mysql-client
bacula-server:~# cd /usr/local/src
bacula-server:~# wget http://downloads.sourceforge.net/project/bacula/bacula/5.0.1/bacula-5.0.1.tar.gz
bacula-server:~# tar xzvf bacula-5.0.1.tar.gz
bacula-server:~# cd bacula-5.0.1

To simplify the configure process, I used a shellscript with all the options (also the ones recommended by the Bacula project)


#!/bin/sh
prefix=/opt/bacula
CFLAGS="-g -O2 -Wall" \
  ./configure \
    --sbindir=${prefix}/bin \
    --sysconfdir=${prefix}/etc \
    --docdir=${prefix}/html \
    --htmldir=${prefix}/html \
    --with-working-dir=${prefix}/working \
    --with-pid-dir=${prefix}/working \
    --with-subsys-dir=${prefix}/working \
    --with-scriptdir=${prefix}/scripts \
    --with-plugindir=${prefix}/plugins \
    --libdir=${prefix}/lib \
    --enable-smartalloc \
    --with-mysql \
    --enable-conio \
    --with-openssl \
    --with-smtp-host=localhost \
    --with-baseport=9101 \
    --with-dir-user=bacula \
    --with-dir-group=bacula \
    --with-sd-user=bacula \
    --with-sd-group=bacula \
    --with-fd-user=root \
    --with-fd-group=bacula

Paste the code above in a file, make it executable (chmod +x) and run it.

If everything worked fine, type:


bacula-server:~# make && make install

Now to the setup of baculas catalog database. In my case, I use MySQL as catalog background, because I already have some knowledge about it. Other databases are supported as well (i.e. Postgres).
Bacula comes with all necessary scripts to create the initial catalog database on a local MySQL instance (I recommend you to apt-get the MySQL server and leave the root PW empty during the bacula setup phase). To have it setup on a remote server, you just need to check out the scripts, strip away the shell stuff and copy&paste the statements to your DB server (Thats what I did).


bacula-server:~# groupadd bacula
bacula-server:~# useradd -g bacula -d /opt/bacula/working -s /bin/bash bacula
bacula-server:~# passwd bacula
bacula-server:~# chown root:bacula /opt/bacula
bacula-server:~# chown bacula:bacula /opt/bacula/working
bacula-server:~# mkdir /backup2disk && chown -R bacula:bacula /backup2disk
bacula-server:~# touch /var/log/bacula.log && chown bacula:bacula /var/log/bacula.log
bacula-server:~# chown bacula:bacula /opt/bacula/scripts/make_catalog_backup /opt/bacula/scripts/delete_catalog_backup
bacula-server:~# cp /opt/bacula/scripts/bacula-ctl-dir /etc/init.d/bacula-dir
bacula-server:~# cp /opt/bacula/scripts/bacula-ctl-sd /etc/init.d/bacula-sd
bacula-server:~# cp /opt/bacula/scripts/bacula-ctl-fd /etc/init.d/bacula-fd
bacula-server:~# chmod 755 /etc/init.d/bacula-*
bacula-server:~# update-rc.d bacula-sd defaults 91
bacula-server:~# update-rc.d bacula-fd defaults 92
bacula-server:~# update-rc.d bacula-dir defaults 90

The following configfiles contain my example config (rename bacula-server-bacula-fd.conf to bacula-fd.conf):

bacula-dir.conf
bacula-sd.conf
bacula-server-bacula-fd.conf
bconsole.conf

Installation of Bweb and Brestore on bacula-server

If you like to actually see whats happening with your backups whithout hacking away on the console, I recommend you to install Bweb.


bacula-server:~# aptitude install lighttpd ttf-dejavu-core libgd-graph-perl libhtml-template-perl libexpect-perl libdbd-pg-perl libdbi-perl libdate-calc-perl libtime-modules-perl
bacula-server:~# /etc/init.d/lighttpd stop
bacula-server:~# update-rc.d -f lighttpd remove
bacula-server:~# cd /var/www
bacula-server:~# wget http://downloads.sourceforge.net/project/bacula/bacula/5.0.1/bacula-gui-5.0.1.tar.gz
bacula-server:~# tar xzvf bacula-gui-5.0.1.tar.gz
bacula-server:~# ln -s /var/www/bacula-gui-5.0.1 /var/www/bacula-gui
bacula-server:~# cd /var/www/bacula-gui/bweb

This is my httpd.conf, which contains logging and authentication support:
bweb-httpd.conf


bacula-server:~# touch /var/log/lighttpd/access.log /var/log/lighttpd/error.log
bacula-server:~# chown -R bacula:bacula /var/log/lighttpd
bacula-server:~# ln -s /opt/bacula/bin/bconsole /usr/bin/bconsole
bacula-server:~# chown bacula:bacula /opt/bacula/bin/bconsole /opt/bacula/etc/bconsole.conf
bacula-server:~# chown -R bacula:bacula /var/www/bacula*
bacula-server:~# cd /var/www/bacula-gui/bweb/script
bacula-server:~# mysql -p -u bacula -h mysql-server bacula < bweb-mysql.sql
bacula-server:~# ./starthttp

After we start lighttpd for the first time, it creates the bweb.conf configfile, which we own to the bacula user:


bacula-server:~# chown bacula:bacula /var/www/bacula-gui/bweb/bweb.conf

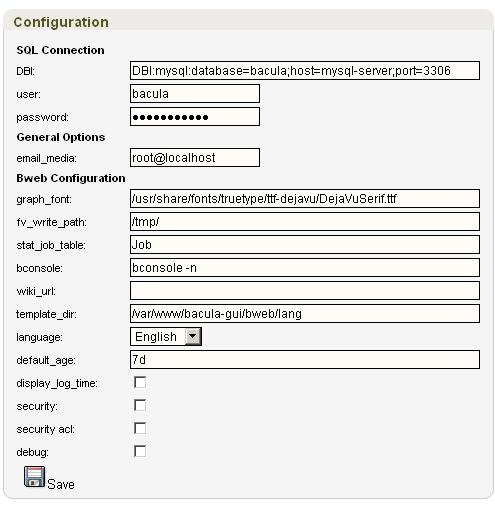
Now, open up a browser and navigate to the bweb page (lighttpd tells you where you can reach it after you start the service). Check out the following screenshot to see how to configure the Bweb instance:
If you also like to run restore jobs in a graphical manner, you can install the Brestore addon to your new Bweb interface.


bacula-server:~# aptitude install libdbd-pg-perl libexpect-perl libwww-perl libgtk2-gladexml-perl unzip
bacula-server:~# cd /var/www/bacula-gui/brestore
bacula-server:~# mkdir -p /usr/share/brestore
bacula-server:~# install -m 644 -o root -g root brestore.glade /usr/share/brestore
bacula-server:~# install -m 755 -o root -g root brestore.pl /usr/bin
bacula-server:~# cd /var/www/bacula-gui/bweb/html
bacula-server:~# wget http://www.extjs.com/deploy/ext-3.1.1.zip
bacula-server:~# unzip ext-3.1.1.zip
bacula-server:~# rm ext-3.1.1.zip
bacula-server:~# mv ext-3.1.1 ext
bacula-server:~# chown -R bacula:bacula ext
bacula-server:~# nano /etc/mime.types

Add a new MIME type:


text/brestore                                   brestore.pl

Restart the lighttpd server:


bacula-server:~# killall lighttpd
bacula-server:~# /var/www/bacula-gui/bweb/script/starthttp

Installation of bacula-client-linux (File Daemon)

I assume, you have a Debian Lenny system up and running.


bacula-client-linux:~# aptitude install build-essential libssl-dev
bacula-client-linux:~# cd /usr/local/src
bacula-client-linux:~# wget http://downloads.sourceforge.net/project/bacula/bacula/5.0.1/bacula-5.0.1.tar.gz
bacula-client-linux:~# tar xzvf bacula-5.0.1.tar.gz
bacula-client-linux:~# cd bacula-5.0.1

I also use a shellscript to configure our File Daemon, to make it more comfortable to deploy on multiple clients.


#!/bin/sh
prefix=/opt/bacula
CFLAGS="-g -O2 -Wall" \
  ./configure \
    --sbindir=${prefix}/bin \
    --sysconfdir=${prefix}/etc \
    --docdir=${prefix}/html \
    --htmldir=${prefix}/html \
    --with-working-dir=${prefix}/working \
    --with-pid-dir=${prefix}/working \
    --with-subsys-dir=${prefix}/working \
    --with-scriptdir=${prefix}/scripts \
    --with-plugindir=${prefix}/plugins \
    --libdir=${prefix}/lib \
    --enable-smartalloc \
    --with-openssl \
    --enable-client-only

bacula-client-linux:~# make && make install
bacula-client-linux:~# cp /opt/bacula/scripts/bacula-ctl-fd /etc/init.d/bacula-fd
bacula-client-linux:~# chmod 755 /etc/init.d/bacula-fd
bacula-client-linux:~# update-rc.d bacula-fd defaults 90

Finally, the configfile for our linux client (rename bacula-client-linux-bacula-fd.conf to bacula-fd.conf):

bacula-client-linux-bacula-fd.conf

Installation of bacula-client-win (File Daemon)

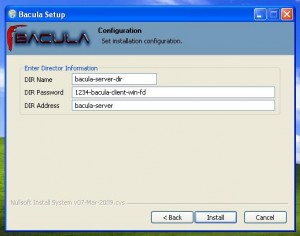
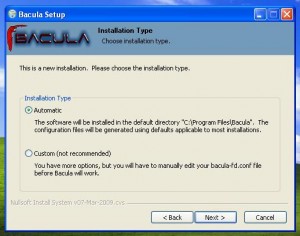
Get the windows binaries from the bacula page and make your way through the install dialogue:
Testing

Starting the Bacula services on bacula-server:


bacula-server:~# /etc/init.d/bacula-sd start
bacula-server:~# /etc/init.d/bacula-fd start
bacula-server:~# /etc/init.d/bacula-dir start

Starting the File Daemon on bacula-client-linux


bacula-client-linux:~# /etc/init.d/bacula-fd start

Bconsole Commands on bacula-server


bconsole
status
list clients
quit

Extended scenario – Tapelibrary on a separate server called “bacula-storage”
In this case, you don’t need to build the whole package. Apt-get the same packages as mentioned in the installation of bacula-server, get the bacula tarball, unpack and configure with the following script:

#!/bin/sh
prefix=/opt/bacula
CFLAGS="-g -O2 -Wall" \
  ./configure \
    --sbindir=${prefix}/bin \
    --sysconfdir=${prefix}/etc \
    --docdir=${prefix}/html \
    --htmldir=${prefix}/html \
    --with-working-dir=${prefix}/working \
    --with-pid-dir=${prefix}/working \
    --with-subsys-dir=${prefix}/working \
    --with-scriptdir=${prefix}/scripts \
    --with-plugindir=${prefix}/plugins \
    --libdir=${prefix}/lib \
    --enable-smartalloc \
    --with-mysql \
    --with-openssl \
    --with-smtp-host=localhost \
    --with-baseport=9101 \
    --disable-build-dird \
    --with-sd-user=bacula \
    --with-sd-group=bacula \
    --with-fd-user=root \
    --with-fd-group=bacula

2be continued with
– Bweb ssh remote command execution to show library status (reminder: don’t forget chmod g-w /opt/bacula/working)
– Extended configfiles

Hints
An Issue, that I noticed was, that brestore didn’t allow you to graphically drill down to the files you wanted to restore. You couldn’t click your way through the path but had to enter the path to the desired file by hand. It seems, that as soon as you back up another host, this problem resolves itself.

Links

Main manual: http://www.bacula.org/5.0.x-manuals/en/main/main/index.html
Ubuntu 9.10 and Windows 7 dualboot with a Fakeraid Controller

I recently tried to install Ubuntu Server 9.10 and Windows 7 in a dual boot configuration on a Promise FastTrak TX2300 SATA RAID1 array and unexpectedly ran into some problems.
It seems that the FastTrak TX2300 SATA RAID controller doesn’t have fully featured RAID options (see Fakeraid: https://help.ubuntu.com/community/FakeRaidHowto) an therefore needs a bit a different approach to make it do what you want.

Here I provide a manual on how I got my stuff working.

Installation of Ubuntu

  • Boot from the Ubuntu 9.10 Server install CD and start the setup
  • In order to use fakeraid arrays, we need the dmraid package; Ubuntu 9.10 already has it included.
  • Partition as usual (e.g. root filesystem with ext4, empty partition (for later Windows 7 installation), swap at end of harddrive)
  • GRUB installation will skip because it can’t write to the MBR, therefore pick “Continue without bootloader” from the installer menue

At this point, the system is not ready to boot. We will handle this later.
First, we continue with Windows 7.

Installation of Windows 7

  • Make your way through the installation and select your Windows 7 partition as installation target.
  • In case the created partition for Windows 7 should not be accepted as valid installation target, you can press Shift-F10 and use the “diskpart” utility to delete and recreate the Windows 7 partition (diskpart, list disk, select disk x, list partition, delete partition x, create partition)

After installing Windows 7, the system is usable (at least 50% of it), allowing you to boot into Windows 7. To be able to select between Ubuntu and Windows, we need to install GRUB, which we skipped in Step 1 and configure it accordingly.

Setting up GRUB

  • Boot from the Ubuntu 9.10 Server CD and enter the “Rescue a broken system” mode. As soon as you get to the Rescue mode switch to another console (e.g. Alt-F2)

mount /dev/mapper/pdc_bfihaijgha1 /mnt (replace with the name of your mapped Ubuntu root partition)
mount --bind /dev /mnt/dev/
mount -t proc proc /mnt/proc/
mount -t sysfs sys /mnt/sys/
chroot /mnt /bin/bash

In my case, I had to enable the CD-ROM as apt package source because I didn’t have a network connection on that computer:


nano /etc/apt/sources.list

and uncomment the line beginning with


"#deb cdrom:[Ubuntu-Server 9.10...."

Now you can install GRUB from the CD-ROM and set it up


apt-get install grub
cp /usr/lib/grub/i386-pc/* /boot/grub/

grub
grub> device (hd0) /dev/mapper/pdc_bfihaijgha (replace with the name of your mapped RAID volume)
grub> find /boot/grub/stage1
grub> root (hd0,0)
grub> setup (hd0)
grub> quit

update-grub (the menu.lst gets created for you)

Add the Windows 7 entry to menu.lst:


nano /boot/grub/menu.lst

and add the following lines to the bottom of the file


title Windows 7
rootnoverify (hd0,1)
makeactive
chainloader +1

here you can also adjust the bootmenue to show up without first pressing “Esc” (comment hidemenue) and change timers. After you have changed everything to your needs, you can restart the system and check if the bootmenue displays everything correctly and if all entries are working.

Setting file permissions using XCACLS

If you work with large quantities of files and have probably come across a situation where you had to modify file permissions, you know that the Explorer GUI is not much of a help. To relieve yourself from clicking your fingers to death, you could use XCACLS, which allows you to script file permission settings. XCACLS is also capable of creating listings of applying permissions.

As a first example on how to use XCACLS, I show you how to get a listing of all permissions applying to the folder c:\temp and its subs.

Grab yourself a copy of the XCACLS package from the MS site and go to Start > Run > cmd and cd to the path where you put xcacls.vbs and run the command below:

cscript xcacls.vbs "c:\temp\*"

The output you get, will look similar to this:


Microsoft (R) Windows Script Host Version 5.7
Copyright (C) Microsoft Corporation. All rights reserved.

Starting XCACLS.VBS (Version: 5.2) Script at x/x/2009 x:xx:xx PM

Startup directory:
"C:\"

Arguments Used:
	Filename = "c:\temp\*"
**************************************************************************
File: C:\temp\access.log

Permissions:
Type     Username                Permissions           Inheritance 

Allowed  BUILTIN\Administrators  Full Control          This Folder Only
Allowed  NT AUTHORITY\SYSTEM     Full Control          This Folder Only
Allowed  DOMAIN\user            Full Control          This Folder Only
Allowed  BUILTIN\Users           Read and Execute      This Folder Only      

No Auditing set

Owner: DOMAIN\user
**************************************************************************

Operation Complete
Elapsed Time: 0.1875 seconds.

Ending Script at x/x/2009 x:xx:xx PM

So far for the displaying of permissions.

As an example for turning on file permission inheritance in a directory tree, simply run:

cscript xcacls.vbs "c:\temp2\*" /I ENABLE /F /T /S

To conclude this post, this is how you specify the owner over a whole dir tree and all subcontents (please take care to invoke the /E parameter to tell XCACLS to only edit the ACL record, otherwise the ACL gets blanked out):

cscript xcacls.vbs "c:\temp2\*" /O username /F /T /S /E

How to use Xcacls.vbs to modify NTFS permissions
http://support.microsoft.com/?scid=kb%3Ben-us%3B825751&x=6&y=13